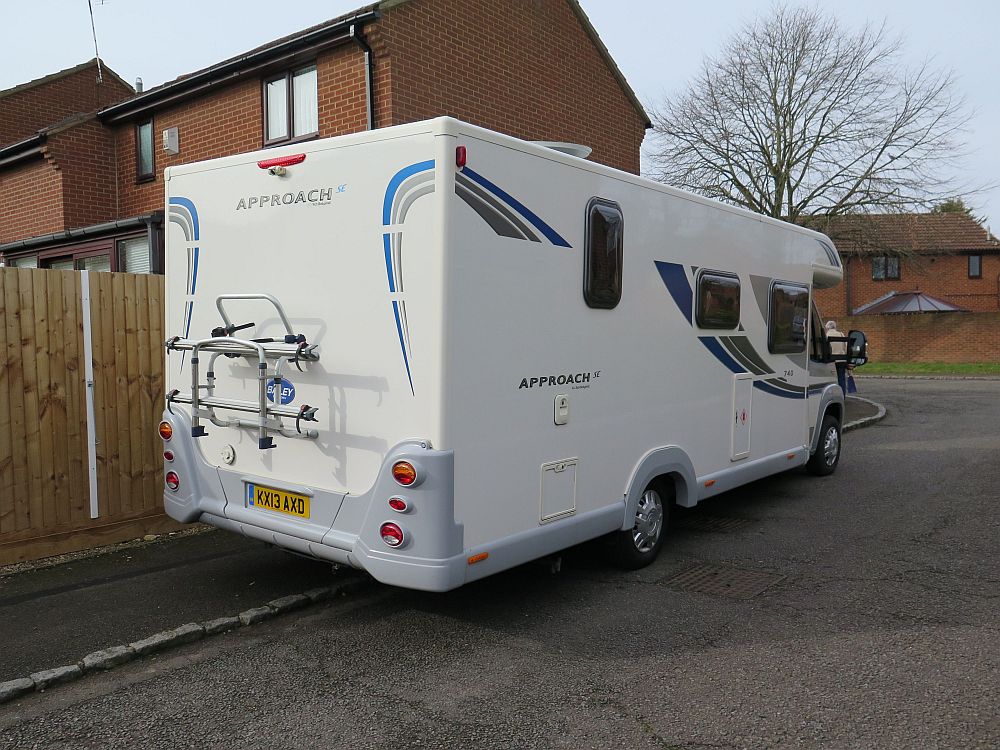
2018 is our sixth season with the Bailey. It has completed just under 21000 miles in that time. The 740 is an excellent motorhome in layout which gives us plenty of room. However on reflection I think we are coming to the conclusion that perhaps it is a bit on the large size for our overall needs. Understandably when thinking about buying a motorhome we in some ways wanted to replicate what we had in our last caravan. The 740 certainly met that requirement. However in terms of practicality a smaller motorhome would have been better on reflection. As an example we have never taken it off site during any of our stays because the real or imagined concern that we would not find anywhere to park. We are also both in our seventies now and since buying the motorhome we have both had medical problems which has slowed us down a bit. This manifests itself in needing to be on sites which are relatively close to transport links or within reasonably easy walking distance of a town/village or place of interest.
We still like the principal of motorhoming for its general ease compared to a caravan and we can't see ourselves going back to towing. Whilst we have liked the fixed bed design, as we grow older, our view has changed and we feel we are moving towards the thought that perhaps two single bunks might be more convenient. The last year has been spent thinking about alternatives and persuading Margaret that we should seriously think about changing. She has obvious concerns about the cost! I do as well but perhaps I am a bit more reckless? Because we now have far greater experience of motorhoming we are in a better position to judge what may be a better choice for us. The trouble is that choice is still quite wide! We have firmed up on the idea of having two singles rather than a fix bed. That gives us a bit of flexibility as usually they can be also be converted into a double if required. We have had to accept that this decision makes it necessary to deal with bedding on a daily basis. Having decided on the sleeping arrangements has narrowed our choice down quite a bit. Another requirement so to see if we could buy a motorhome that was easy to take off site. Not necessarily into town centres but at least to the supermarkets and perhaps the odd country house or even just out for a drive which we have felt was not possible with the 740 although many people do. This initially got us thinking about van conversions. They have the advantage of being compact and would meet our requirements for off site use. Whilst we were very tempted I think in the end we could not reconcile ourselves to the loss on internal space just to satisfy the need for compactness.
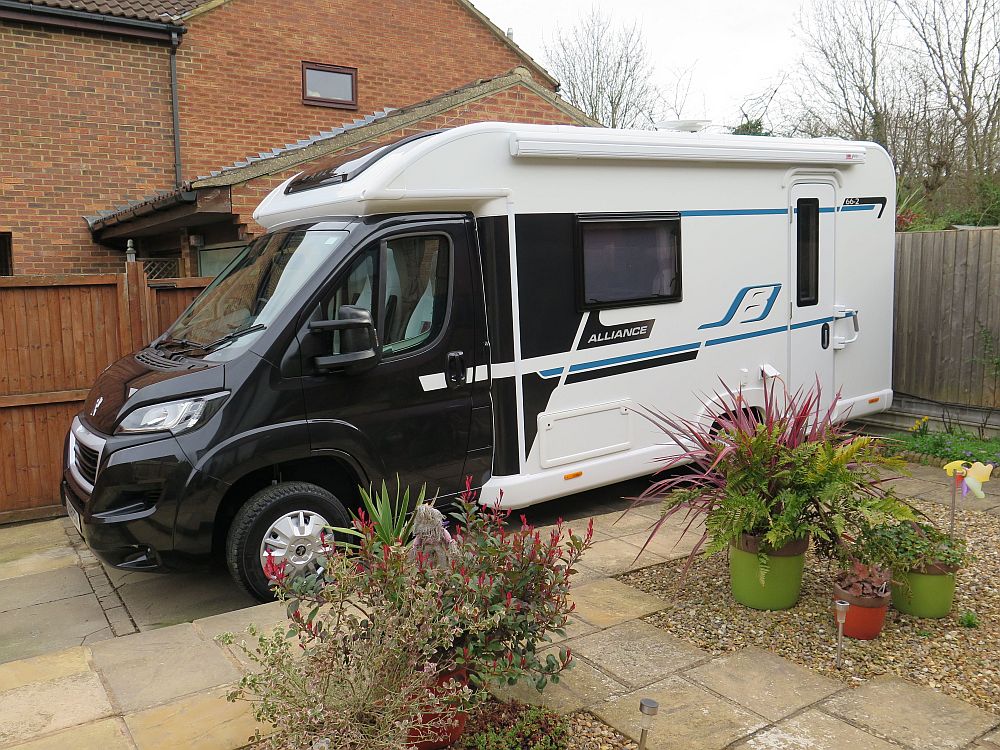
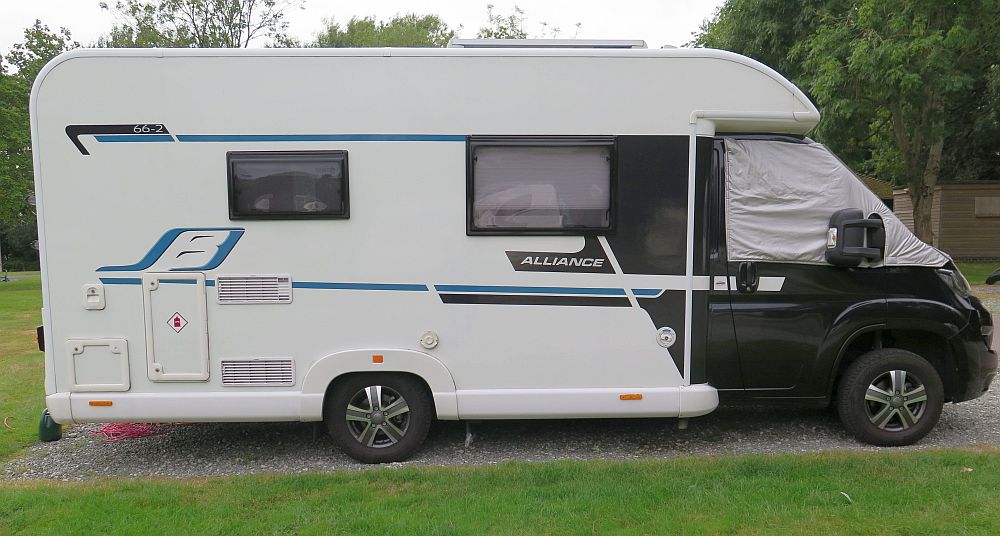
This got us thinking about a middle way and started to look at coachbuilt motorhomes that had two long bunks but not too long in length. We have been to dealers and to the NEC. To cut a long story short we narrowed it down to another Bailey model in the Advance range. This range was introduced about two years ago as a pretty basic model. A year later they did a major revamp which included better equipment levels and tweaked the model name from Advance 635 to the Advance 66-2. This model has two long and quite wide bunks. Kitchen amidships and an end bathroom so very much in the style we were used to in a couple of our previous caravans which worked well for us. The only downside was that there was a step up from the kitchen into the lounge area which we would have preferred not to be there. Having more or less settled on this model Bailey only went an introduced another range called the Alliance with exactly the same layouts as the Advance but with much higher levels of equipment. Both ranges were to run side by side. We were able to have a look at both models at the NEC in October 2018. Obviously the Advance 66-2 would be more affordable than the new Alliance model but we would have to add some essential equipment to the Advance which was included in the Alliance which narrowed the gap a bit! So by now we had more or less decided that the 66-2 model was what we wanted but were still to decide whether to push ourselves and go for the better equipped model. We would really only get a proper idea when we talked to our dealer.
Our Bailey 740 had been purchased from White Arches Motorhomes near Rushden. The only problem was that they never ever seemed to have an Advance 66-2 in stock. Plenty of other models but not the one we were interested in. I emailed the branch manager to see when they were likely to have one in stock. It seemed unlikely they would have one but he did offer to let us see one that had arrived but was already sold to another customer. We duly made arrangements to have another look. It was interesting to see the 66-2 along side the larger Autograph range which is the latest successor to the Approach that we currently have. Not only is the Advance about 90cms shorter but it is also about 10/12cms narrower. The 740 is fine on ordinary roads but you often feel pushed into the hedgerows on narrow country lanes with passing traffic! Sitting in it at White Arches we did, probably for the first time, a better sense of the size. Decision time. We only had a rough idea of what ours was worth as someone at the NEC had done a back of the envelop deal for us on a van conversion so that was our starting point. For the Advance the offer was not quite as good so we enquired about the Alliance. This worked out better, albeit still more expensive because of the gap between the two models, because we had less to add and the deal was an improvement. The deal has been done and we hopefully take delivery sometime in March 2019. Had we kept the 740 we would have needed to replace the tyres. We would also have had to pay for another cab and habitation service plus MOT and another years VED so those savings will all go to softening the cost of the purchase of the new van!
Friday 8th March 2019. Collection day has arrived. The 740 has been moved to the side of the house for the last time! So with a mix of sadness and excitement we made our way to White Arches Motorhomes at Irtlingborough. As we pulled into the yard we could see our new motorhome. Neil the manager went through everything with us although it all made more sense this time than six years ago. Unfortunately the spare wheel and frame had not arrived which was an extra we had fitted so we will have to return to have that added at some stage in the future. As it is not a standard fitment we do have the standard gung pump should it be needed!
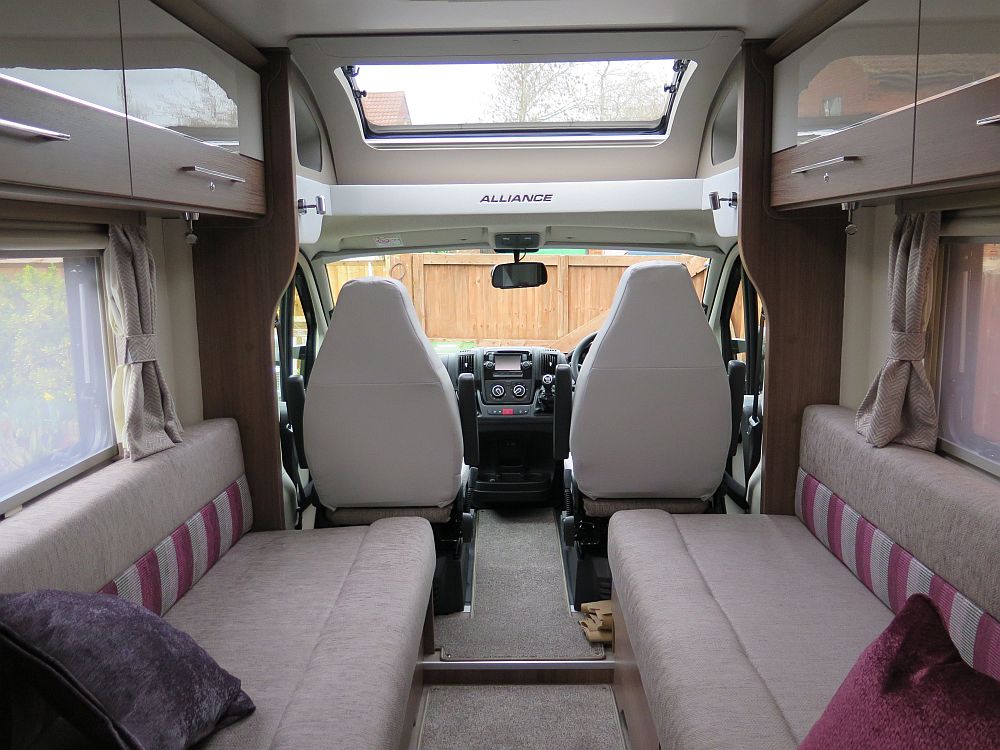
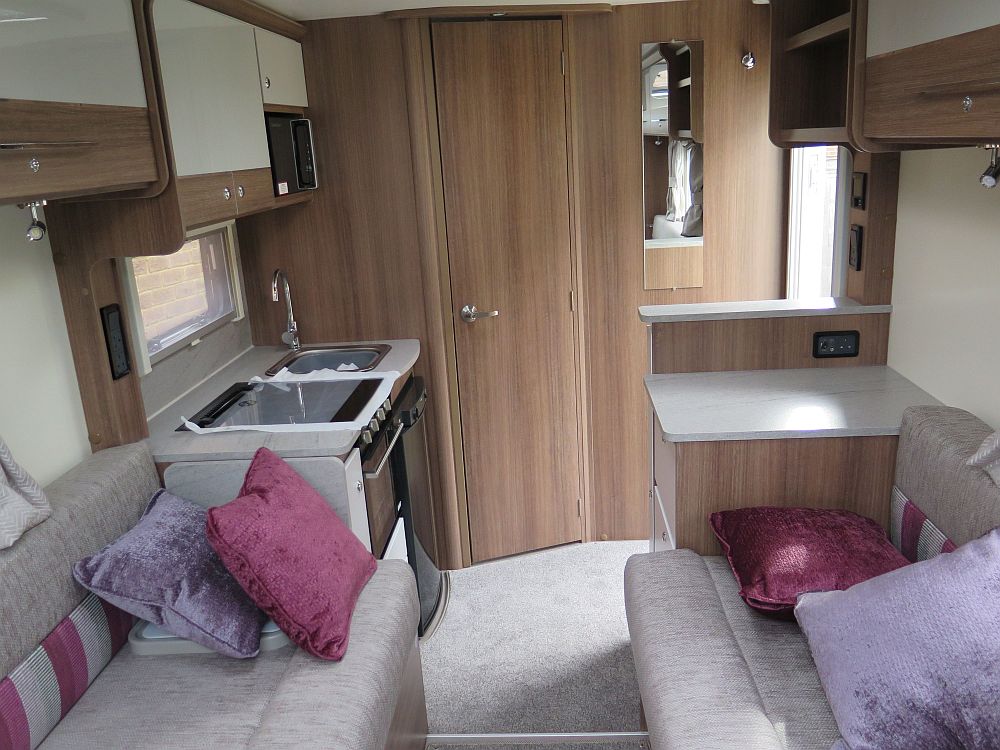
Two weeks after picking up the Alliance we set off for our first stay in our new motorhome. We didn't venture far, just to Moreton in Marsh which is about 50 miles from where we live. Although it is not massively shorter than the old 740 motorhome the 66-2 does seem to have a lot more room on the pitch. Much of what we have in the new motorhome is similar to the old but I suppose there are two major differences. Firstly we have the make the beds up each night and secondly whilst it shares the same Truma Combi boiler as the last van this one has the CP Plus electronic control panel. The bench seats that form the two single beds are about 30 inches wide so will accept standard small single fitted sheets. We also purchase duvets as we didn't fancy going back to sleeping bags. We found some nice ones in John Lewis which weren't too expensive and were rated a 7 TOG so a bit of a half way house between summer and winter rating. One issue was what to do with the backrests? The bed on the kitchen side of the van can be pulled out to form the double. So what we do is the pull it out a bit and drop the back rest down behind the cushion. The other back rest we stand in the door way. With a bit of practice over a few nights and mornings we seem to have got into a good routine of setting up at night and putting away in the morning. All the bedding stores in the generous under bed storage space. This has been a major change for us as the previous van had a fixed bed which was always made up. At least with two single beds we don't disturb each other should we need to get up in the night!
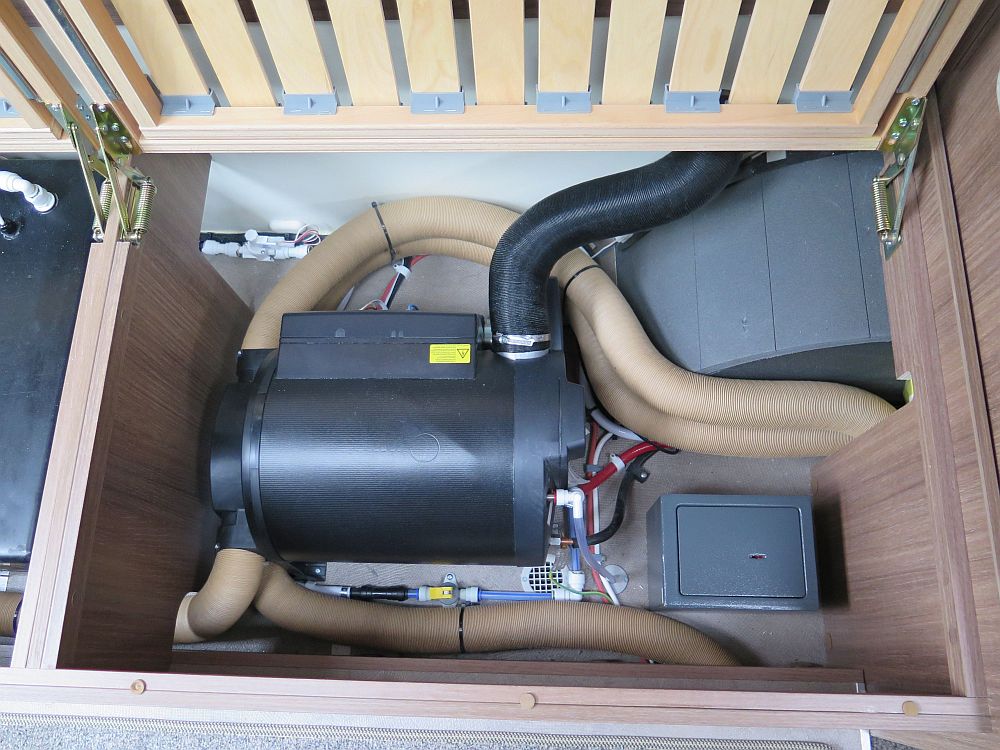
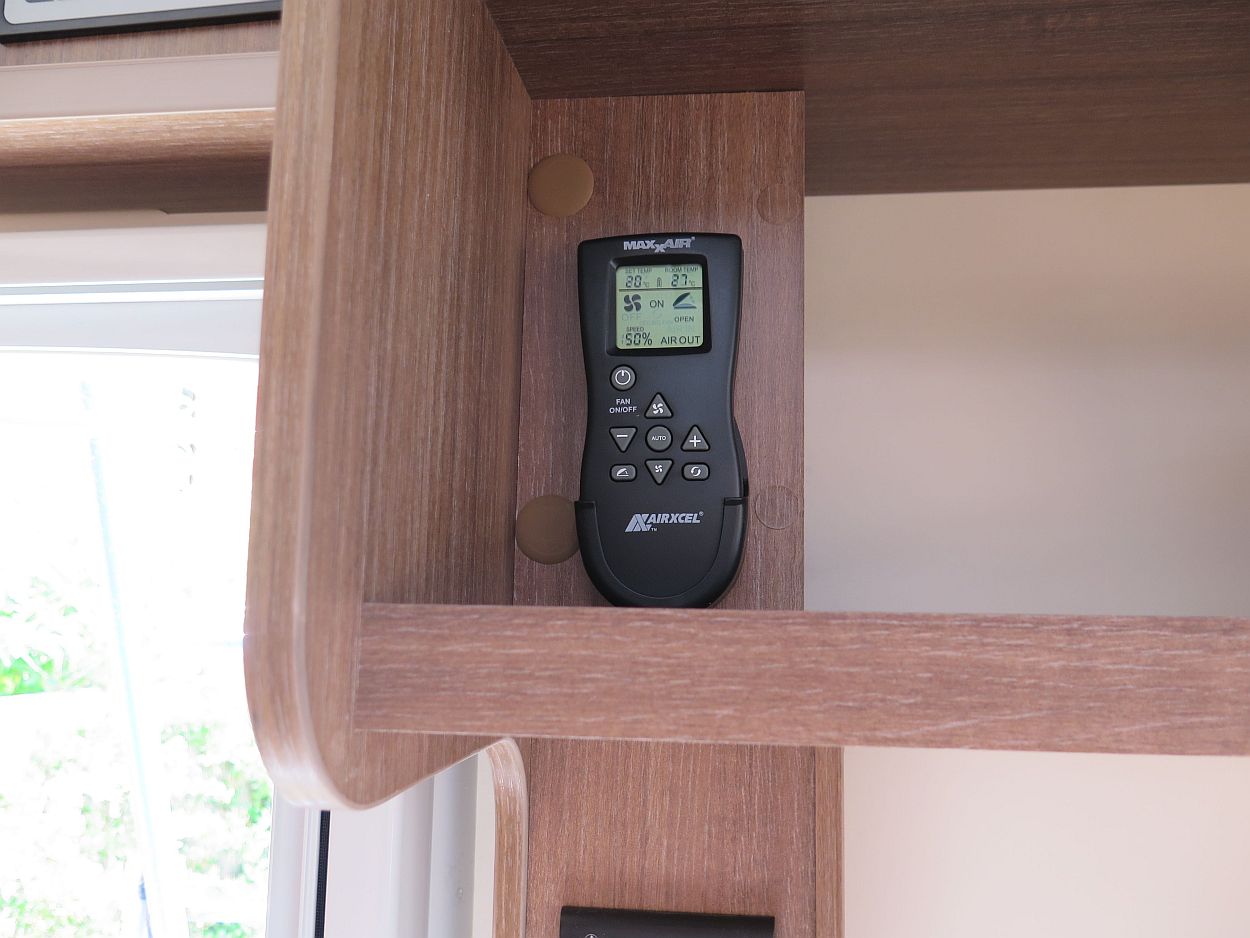
The Truma CP Plus control panel has been a bit more problematic. Not because there is anything wrong with it but it is a bit more complicated than a switch and two dials on the old motorhome. If you wish to operate any element of the system you must first remember to have the 12 volt Master Switch on, which is a change from the old system. Once you have mastered that the control panel gives you a lot more options. You can opt for boost to make sure you get enough hot water. There is a fan speed setting that allows the pumping of either hot or cold air around the van. We do like the fact that we have more warm air towards the cab area of the van. If there is a downside the bathroom is not as warm as its almost the furthest point from the boiler.
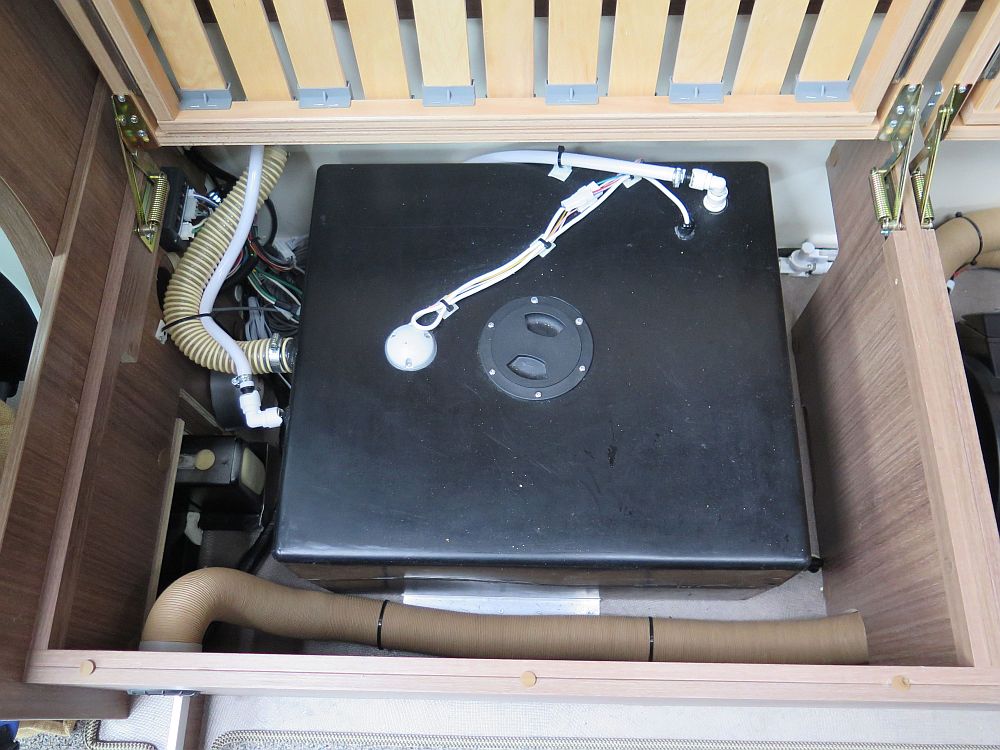
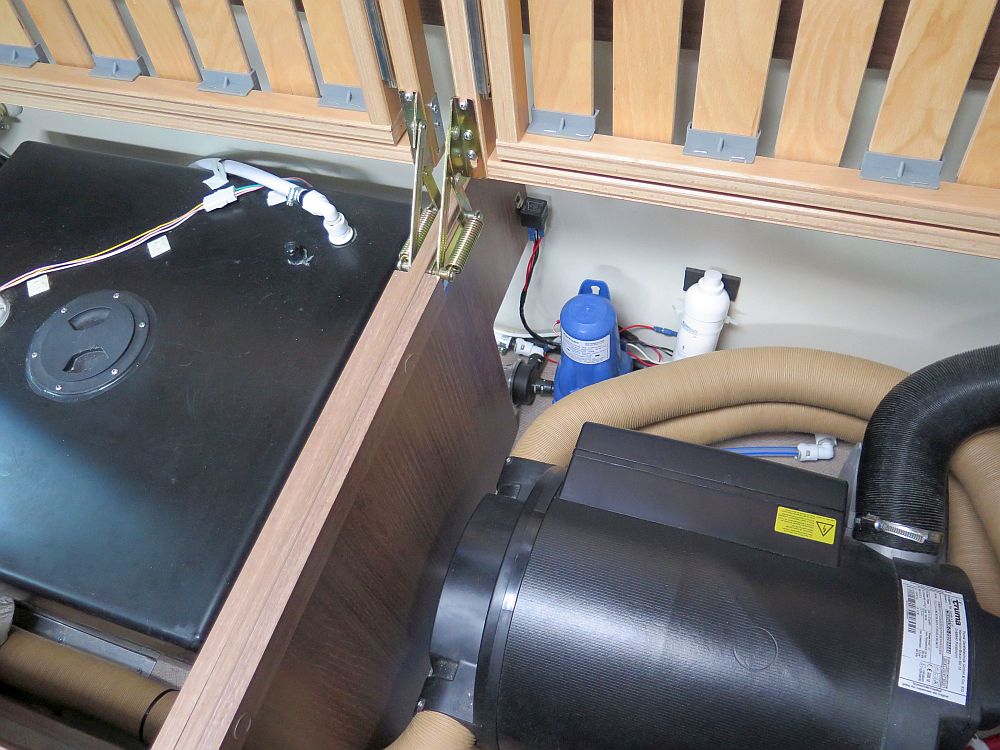
The water supply system in the 66-2 is quite different to the 740. Firstly the tank is inboard rather than slung under the van. Fortunately there is not much difference in capacity. An inboard tank has the advantage that it offers more protection from cold temperatures which is very much a positive. If there is a negative it is that it takes up valuable potential storage space. The 740 had a much more substantial water pump whilst the 66-2 has what is essentially a submersible pump similar to what you would use in an Aquaroll. It generally works perfectly well but the power of water delivery is not the same as the 740. We have experience a few issues with the pump as it tends to come on continuously which means to have to adjust the pressure control valve. On one occasion even this was not the remedy and I resulted to disconnecting the main water pipe from the tank which did the trick. Not sure you should have to do this. I should mention we have only had this issue between site so whether it's something in the transit that changes the situation I don't know.
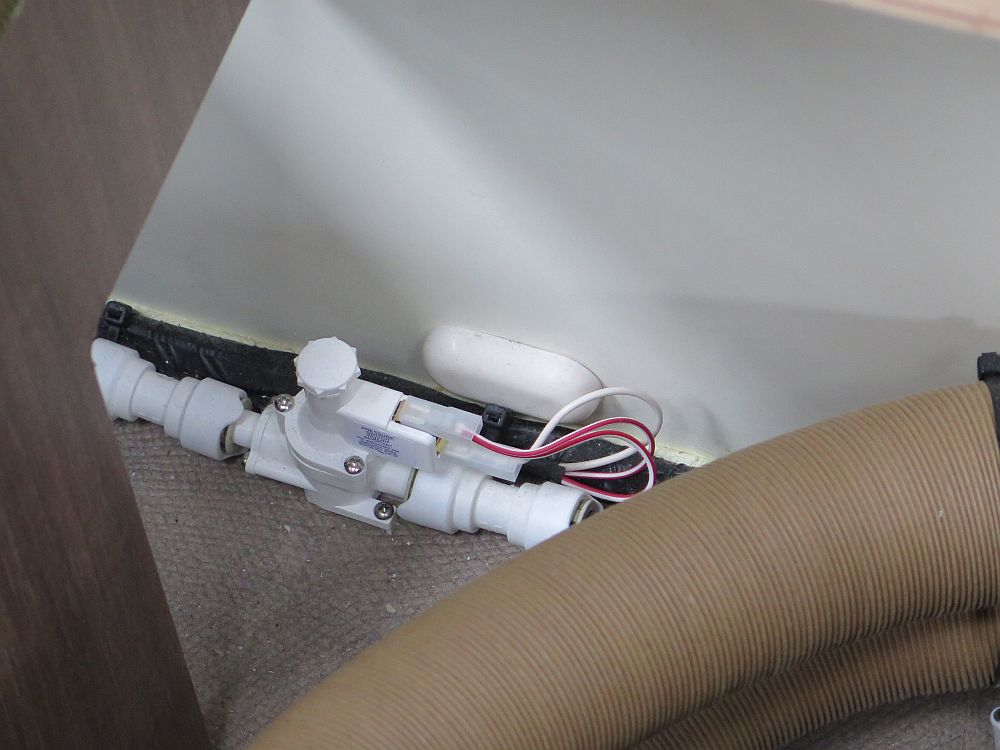
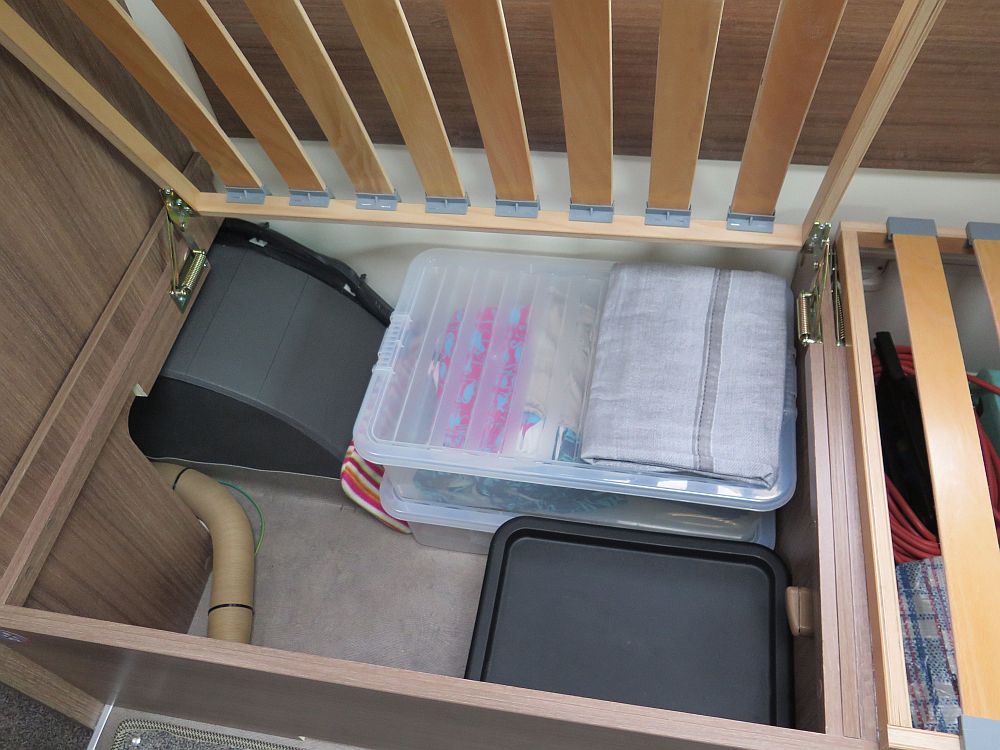
Because Bailey have raised the floor in the living area both the storage areas on the nearside and the space that occupies the water tank and the boiler are quite deep. I am wondering if there are opportunities to make use of the space above the water tank and boiler for more storage but that is probably a project for later on!
At the end of April we travelled down to VanBitz at Taunton to have a Strikeback alarm fitted, the same as we had done six years earlier with the 740. These alarms cost in the region of £600 so not cheap but they have an excellent reputation. It is a full day job so they provide a free night at the adjacent campsite called Cornish Farm. The 66-2 also has a solar panel fitted but penny pinching by Bailey meant that it was only connected to the leisure battery so unless the engine is running there is no charge to the cab battery. This was the reason we asked VanBitz to fit a device called the Battery Master which sends any excess charge from the leisure battery to the cab battery. We had one fitted previously to the 740 and that provided excellent service during our ownership of that motorhome. Unfortunately, whereas last time it was fitted at a discount this time we had to pay full price!
By our last trip away in 2019 we had clocked up 68 nights away in the Alliance. The start of 2020 was always going to be a difficult start as we were having a new kitchen fitted at home in February so we didn't really have time to get away. However we had planned to use the motorhome whilst they were doing the kitchen but unfortunately this did not go to plan. This idea collapsed when I tried to test the heating and only succeeded in getting error codes up on the CP Plus panel. I tried everything to reset but it wasn't playing ball so we had to struggle on in the house although we did mange to wash up in the van! Early in March we took the motorhome to White Arches for it's first annual service. They discovered that the PCB on the Truma boiler needed to be replaced, this was going to take a few days to get the spare parts. It was at the time when initial concerns about the Corona Virus, or COVID 19 as it is now referred to was starting to get serious in the UK. Fortunately they managed to complete the work and we collected the van on 13th March, only days before the lock down!
As I write this, three weeks into May there are still many measures and restrictions still in place and it seems unlikely that campsites will reopen before the 1st July, although this could change if there is a real improvement or, of course, it gets worse! Belonging to the group of pensioners over seventy who have been told to self isolate we are waiting for changes that would release us from house arrest!!! I am not sure it will be much fun going away if there are still a lot of restrictions in place so we will bide our time and perhaps wait until later on before making any decisions on going away in the van.
Bailey seem to fit Banner Leisure batteries as standard. I am sure they are fine batteries but they are not "no maintenance" so need topping up from time to time, particularly in hot weather. In the Alliance range they only seem to fit 85 AH batteries which is fine if you always use electric hook-up but you might want a larger battery if going off grip for longer periods. There seems to be room in the under floor battery box for something larger. When I came to top the battery up I discovered I hardly had any distilled water left. I seem to recall that we purchased some de-ionised water for Margaret to use in her iron so I checked with Google that it was OK to use as I didn't really understand the difference between the two. Apparently either is fine.
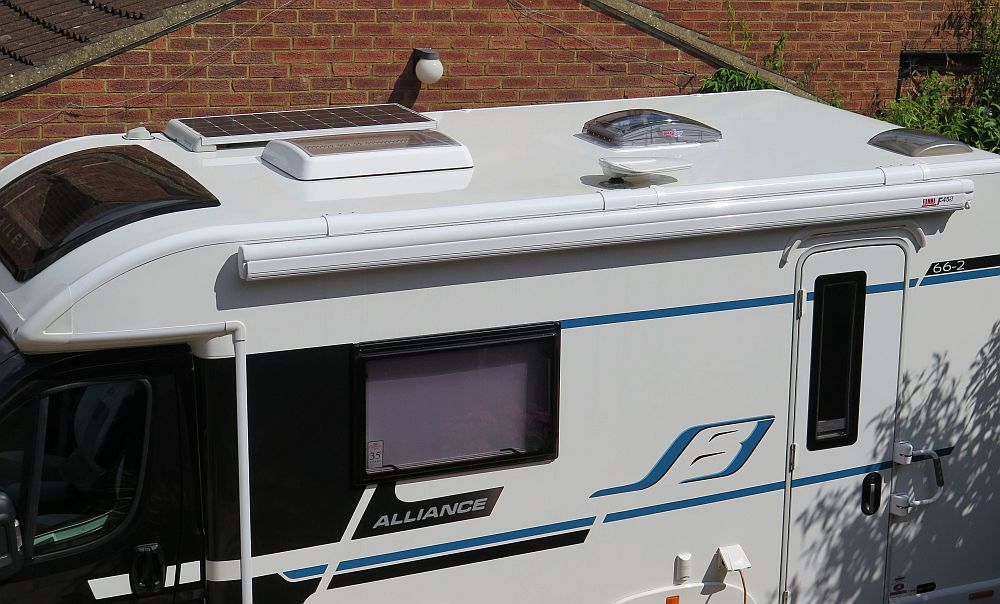
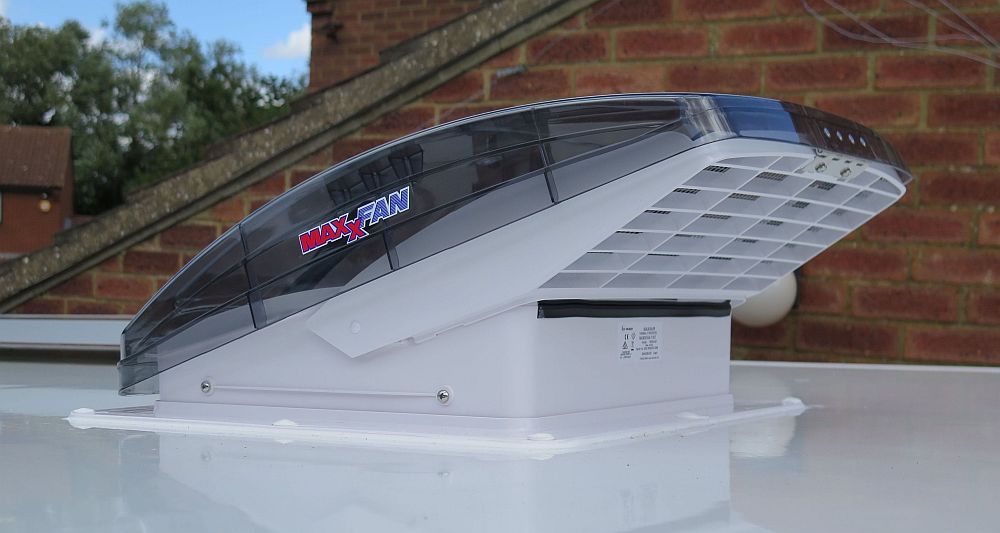
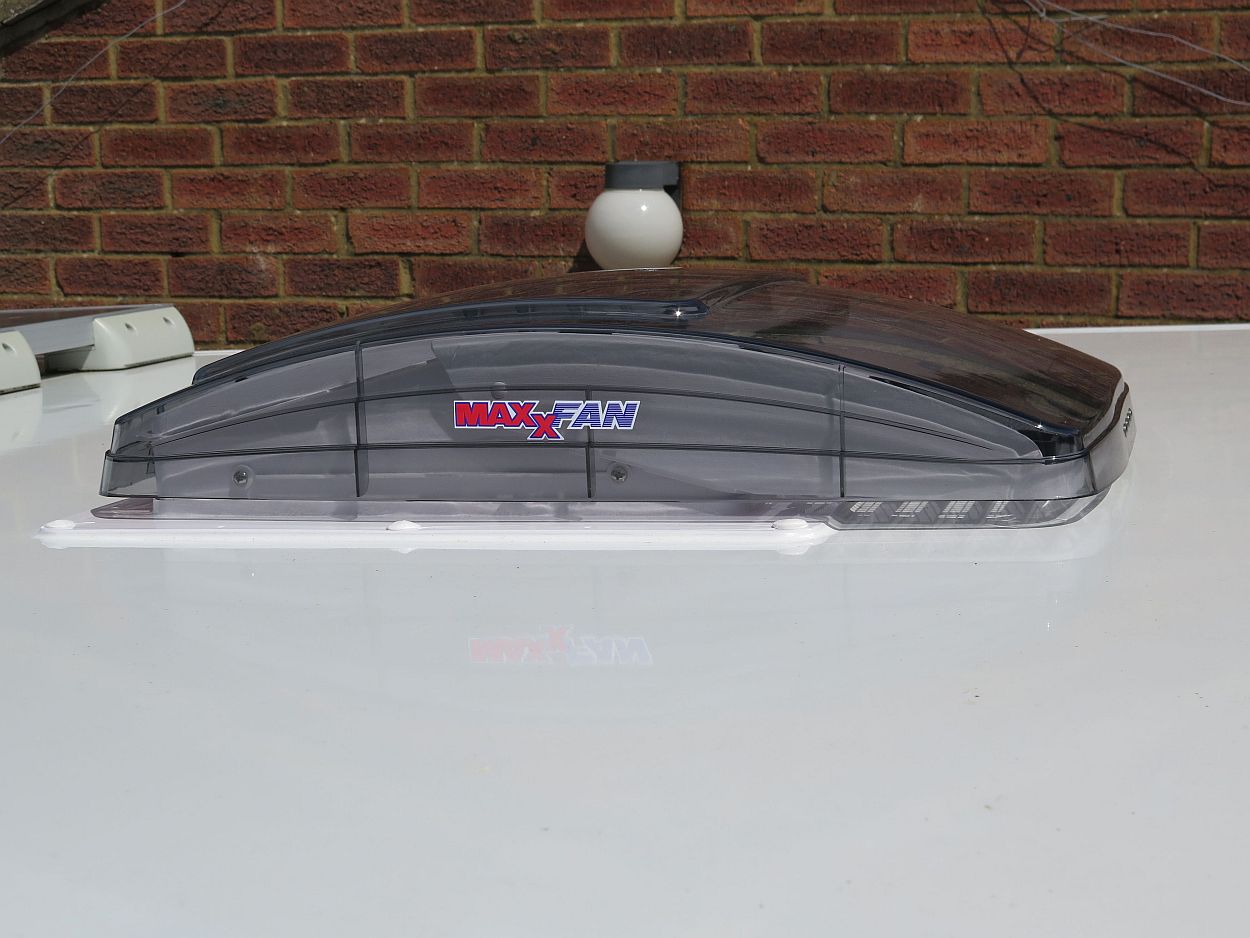
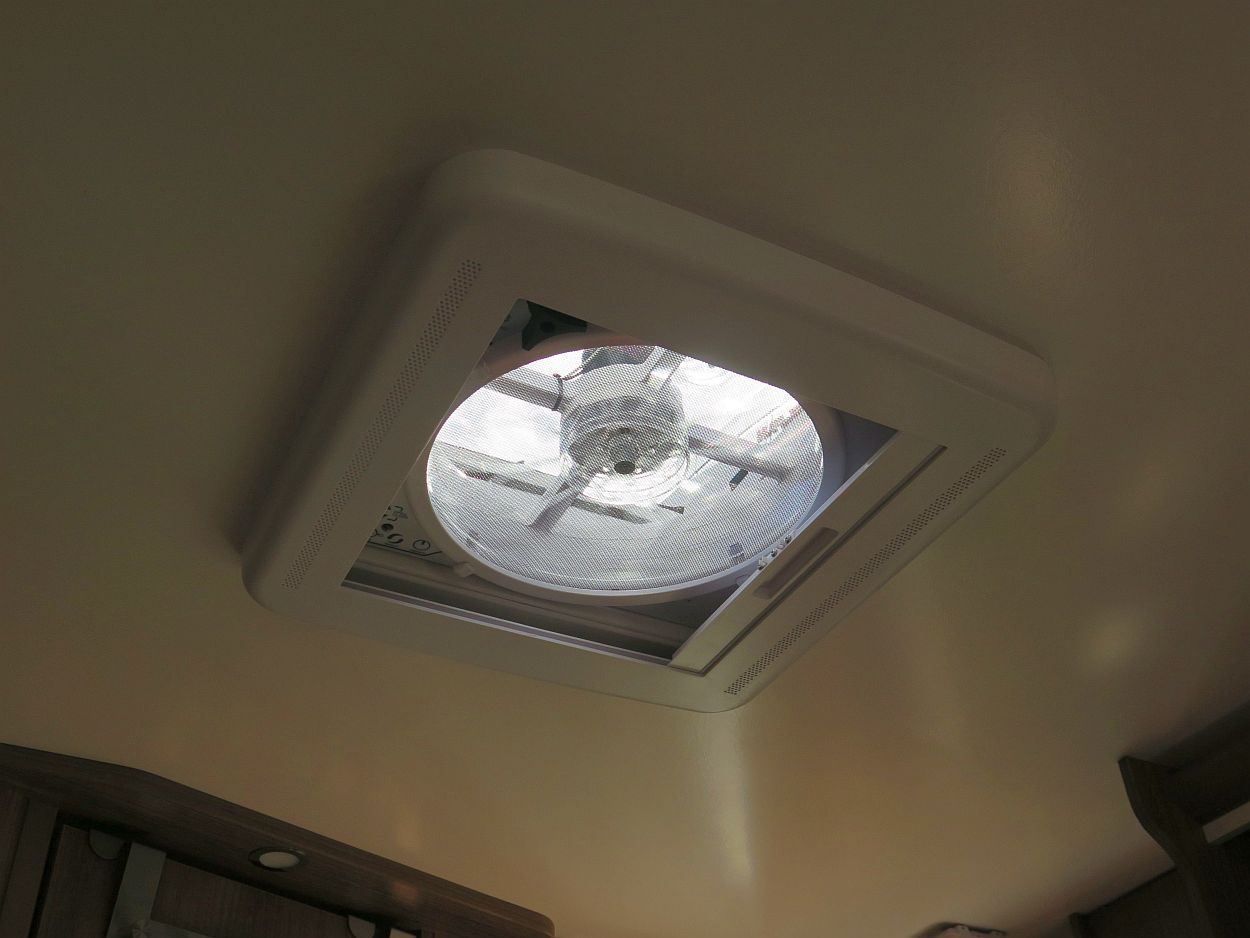
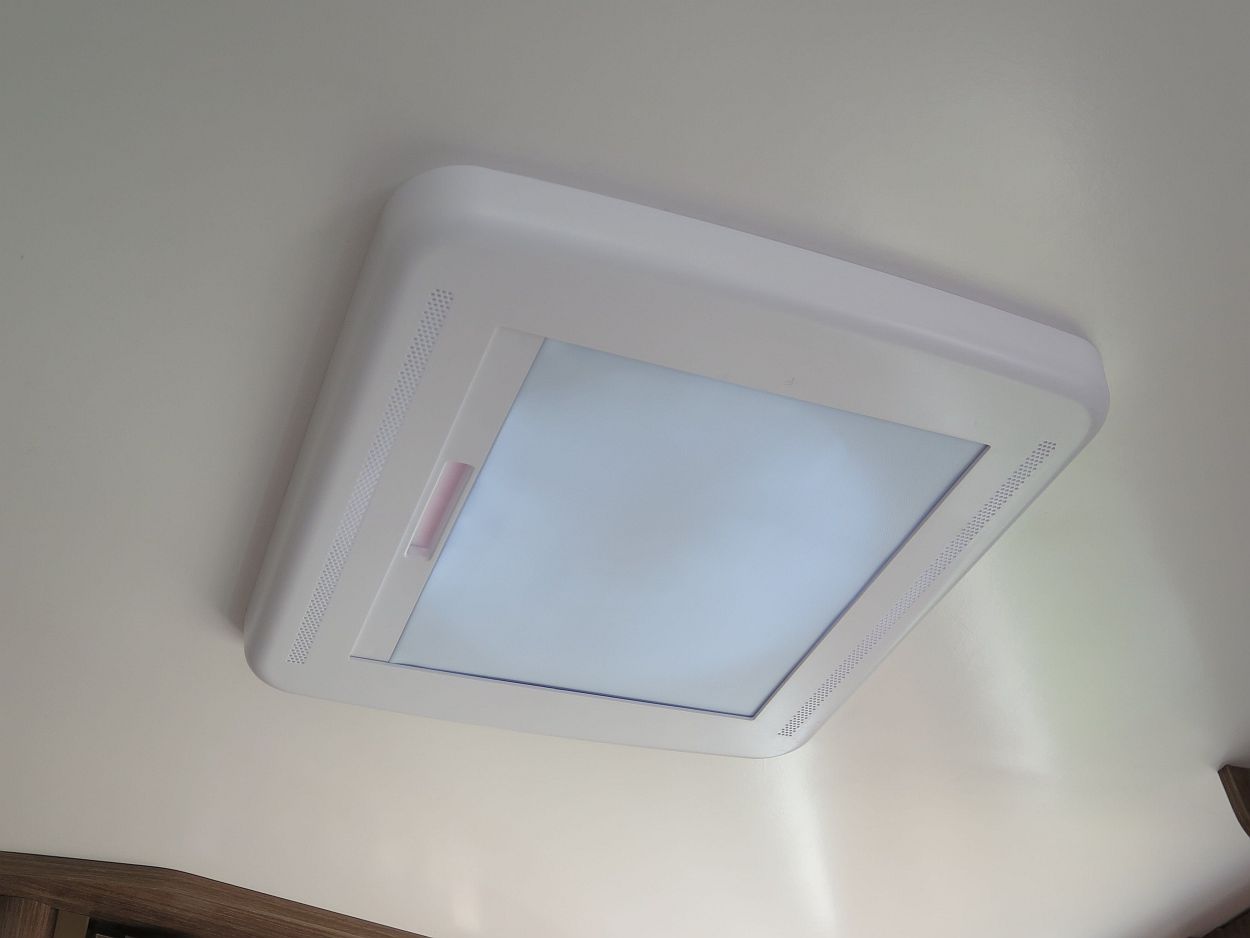
June 2020. One of our caravans had a powered extractor fan over the kitchen which we found a useful bit of kit. The Alliance only came with the standard 400x400 Heki vent. A while ago I noticed that Road Pro of Daventry sold a power vent called a MaxxAir. This is a step up from the powered vent we had in previous caravans. Despite costing around £500 fully installed we bit the bullet and arranged for Road Pro to fit one for us. It took about half a day. They made a very neat job of it and somehow even managed to route the wiring out of sight. We decided to have the vent night screen fitted as an optional extra. The vent can be controlled manually or via the included remote control. It can suck air in and suck air out depending your requirements. Our hope is that we will be able to use it as a cooling fan in hot weather, this will save taking a freestanding fan with us. On full power it is quite noisy but take it down a notch or two and the noise is perfectly acceptable. You can set a required temperature although, as yet, we have not put that to the test. It is a neat installation and only fractionally larger than the original vent. See pictures below.
New Table for Lounge
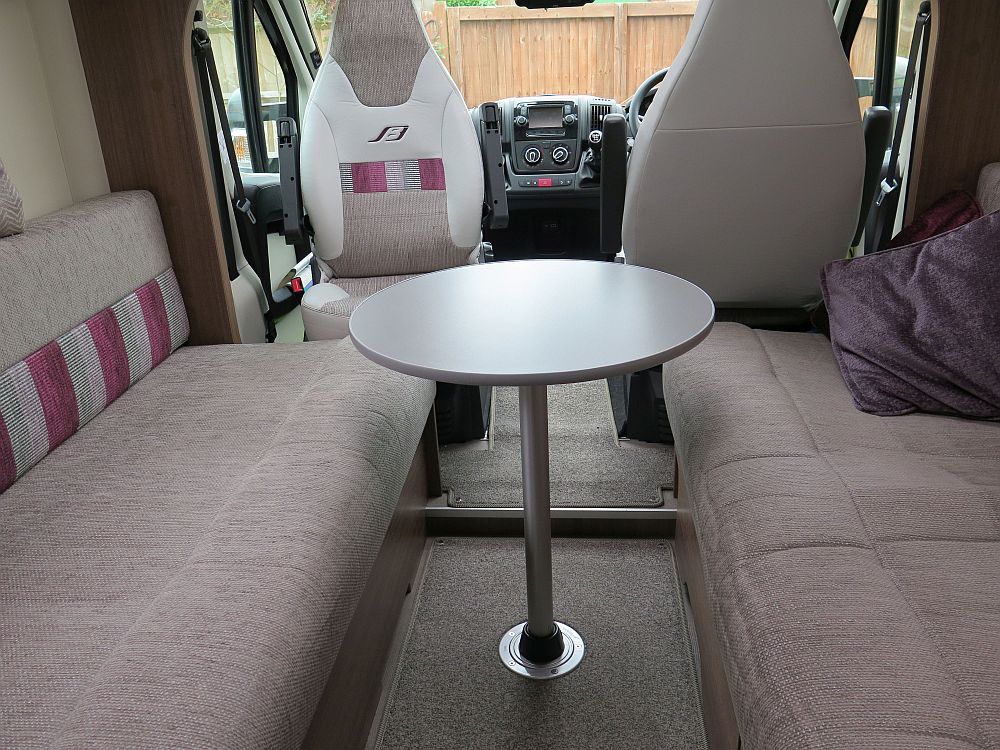
In both motorhomes we have owned we have felt that the supplied table is far too large, and heavy, for our day to day needs. We rarely have guests in the van so the need for a larger table is not really necessary although we do occasionally use the supplied table on the rare times we eat outside.
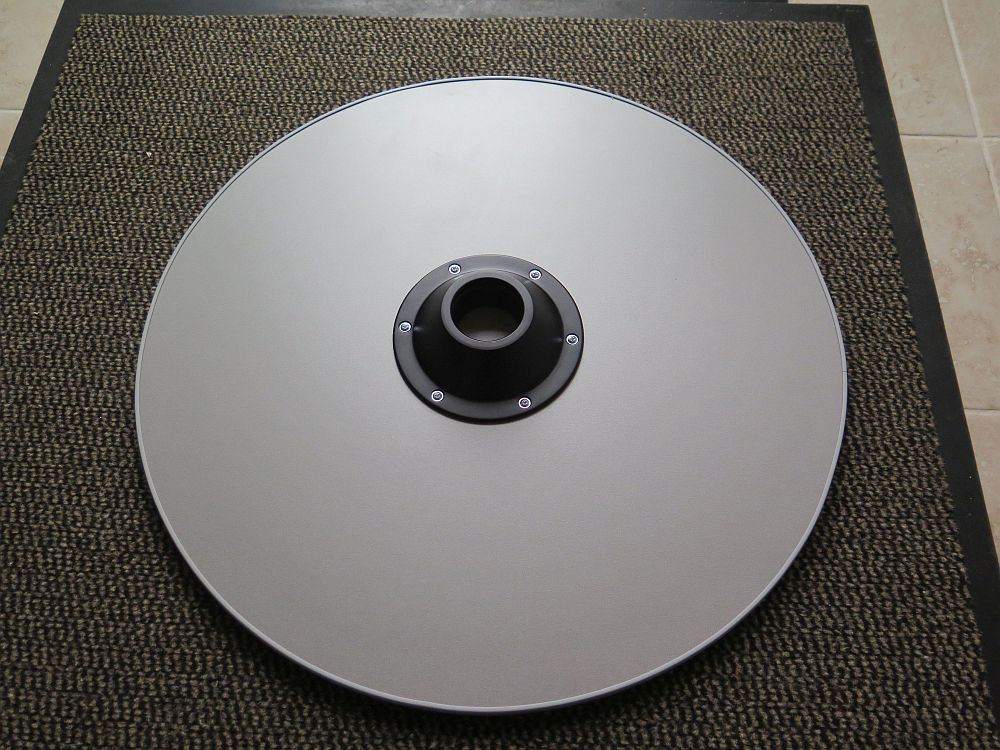
This set me in search of an alternative. By means of a plywood mock-up we were able to decide on size and whether it should be square or round. We both sat in the van with this wonky mock-up, even at one stage adding dinner plates to check to see if they would fit. We decided that a round shape of 60 cms diameter would suit us best as it would allow room to get round if needed. The next question was whether it should be in a fixed position or whether we should employ a swing arm to mount the table top on. In the end we decided on a fixed but, obviously, removable table leg design. What we discovered was that there was not a lot of choice out there, particularly in colours. An internet search brought up a company called Clearcut Conversions who specialise in selling equipment to convert vans into campers. For our purposes they sold a Sequoia Leg kit and a table top for £110 which was a reasonable price. It was ordered on the Sunday and arrived on the Tuesday, so pretty speedy service.
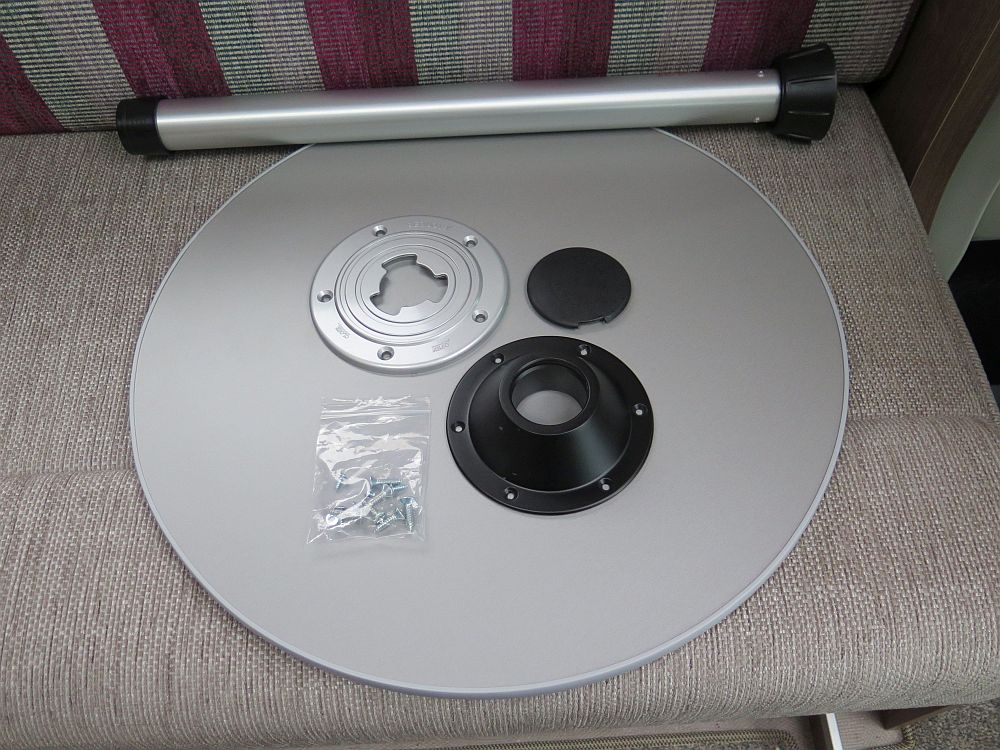
The first task was fitting the upper collar to the underside of the table top. First you need to mark it centrally on the table top. I found measuring in from the edge until it was equal distance from four points around the table worked. I decided that it did not need to be millimetre perfect! Now for the most difficult part of the job, drilling into the table top and avoiding going all the way through! It was held in place with self tapping screws so you only need a hole deep enough to get the screw going. Fortunately I was successful in not drilling all the way through and fixing the collar in place was easy.
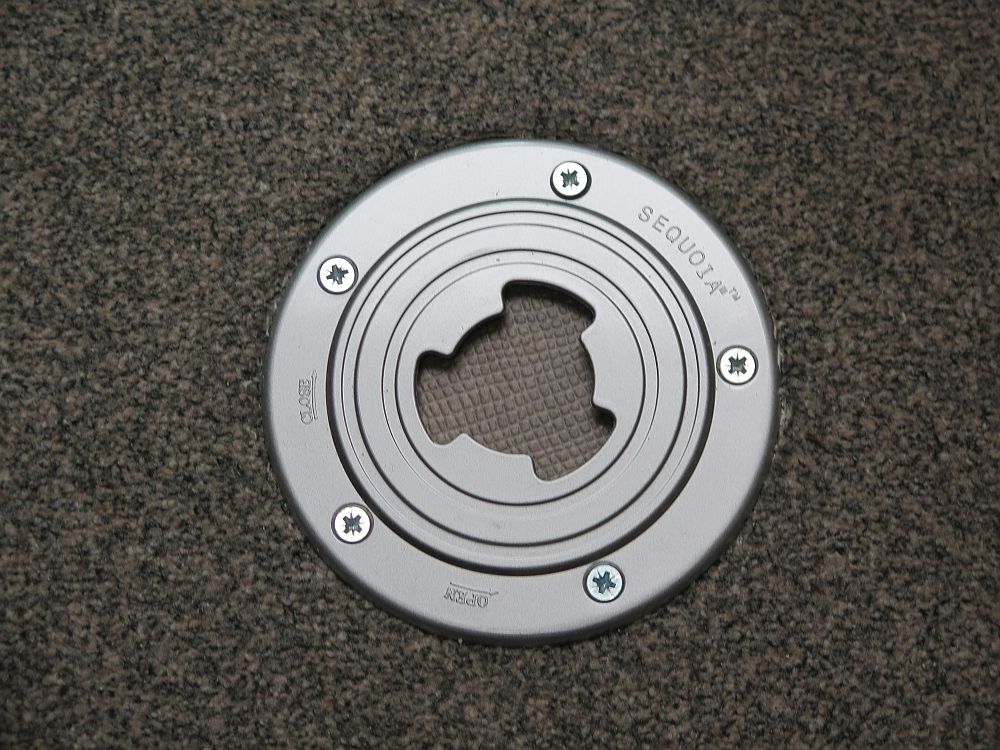
Next was the tackle the floor plate. Where the table is positioned the Bailey has a double floor and the screws provided were short enough not to protrude below this section of floor. First job was position the floor plate on the carpet so that I could cut out the carpet. Once that was done I was able to fix the floor plate in place.

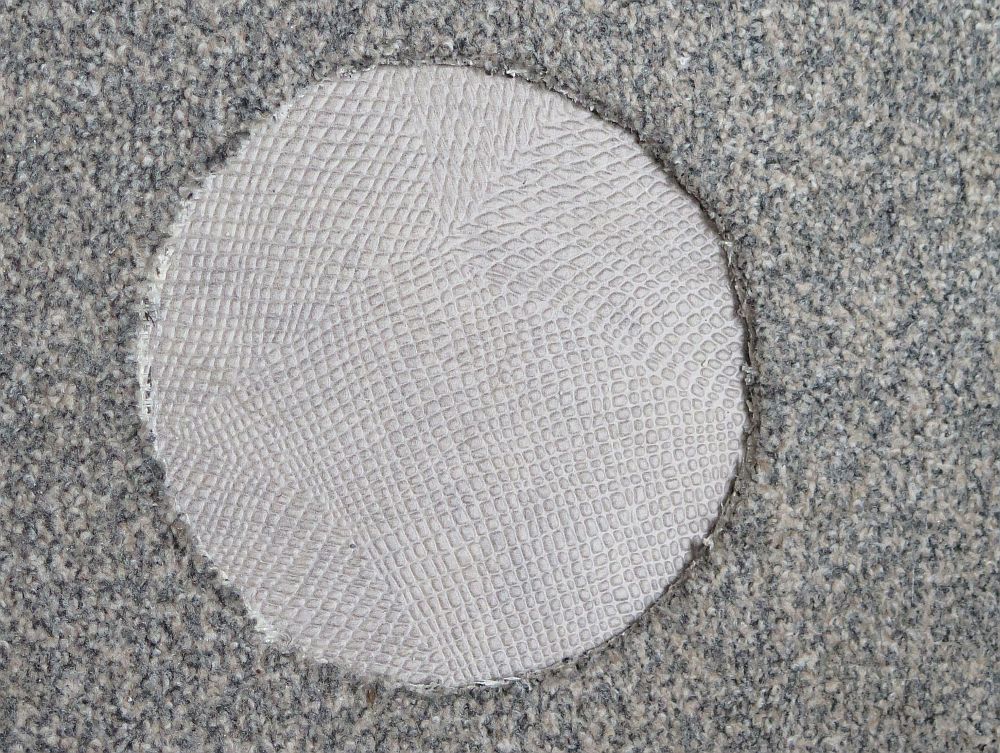
The floor plate is held in place with quite thick screws so it should be quite solid. When not in use the is a little plastic cover that fits into the hole so you won't trip over it!
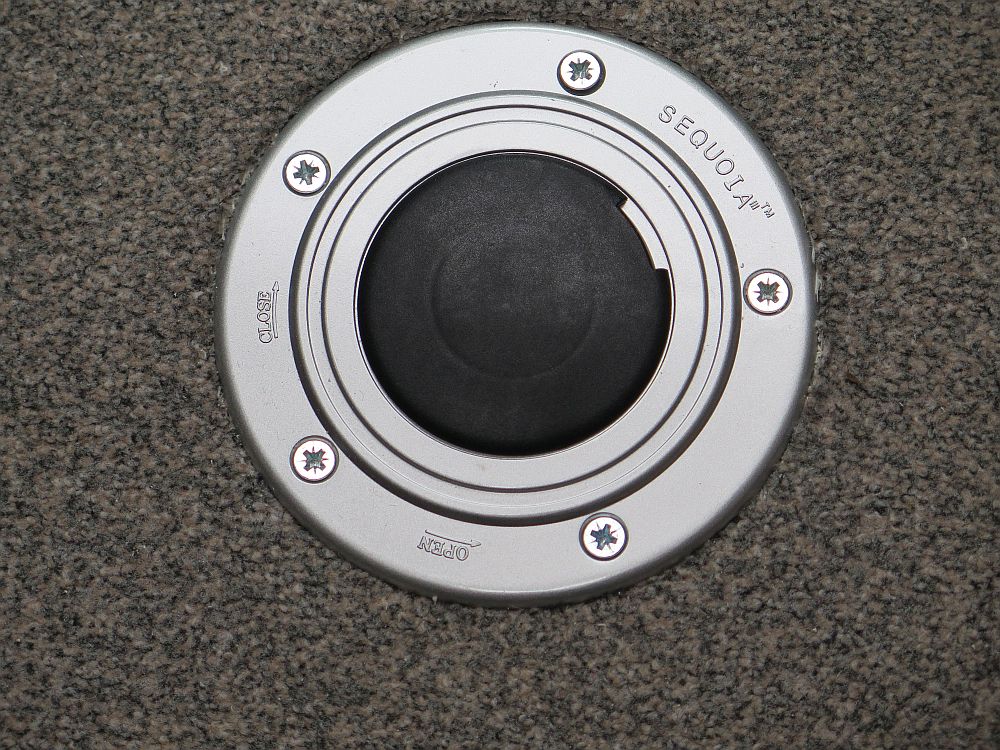
All that was left to do was to fix the leg into the floor plate which is done by lining up the lugs and twisting. For extra stability there is a plastic collar that screws down onto the base plate. Removal is just a reverse. The table top can also be removed from the table leg for easier storage when not in use. A minimum set of tools was required for the job, crosshead screw driver, drill, scissors for cutting the carpet and a pencil and tape measure so not really a demanding job which can be completed in about an hour.
![]()
D Lock for Habitation Door
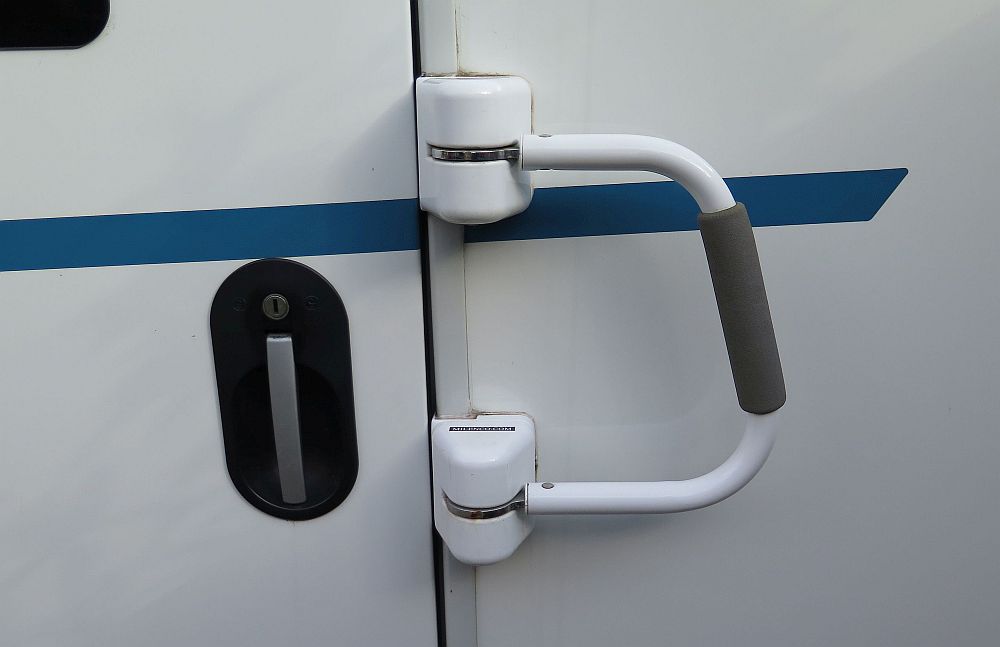
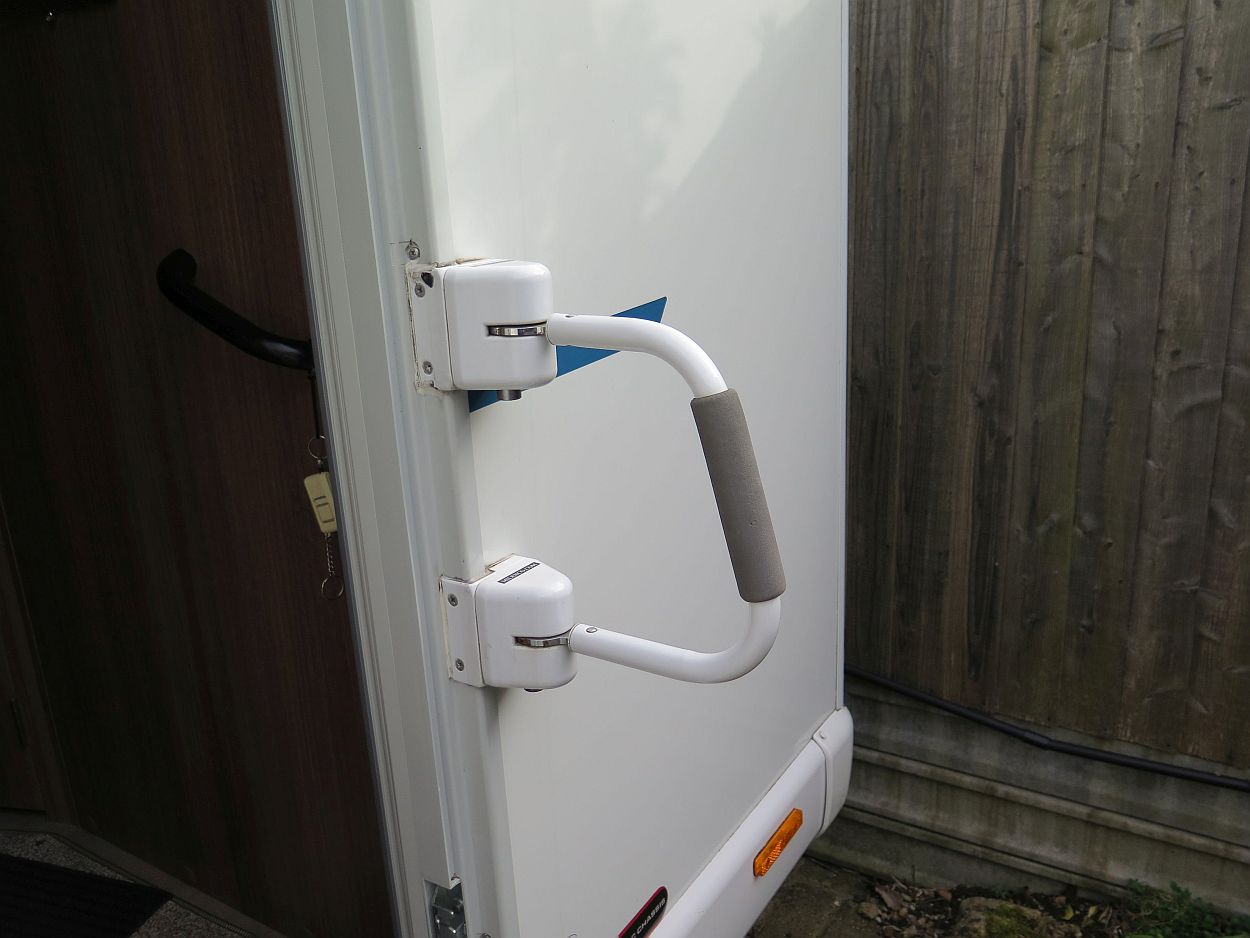
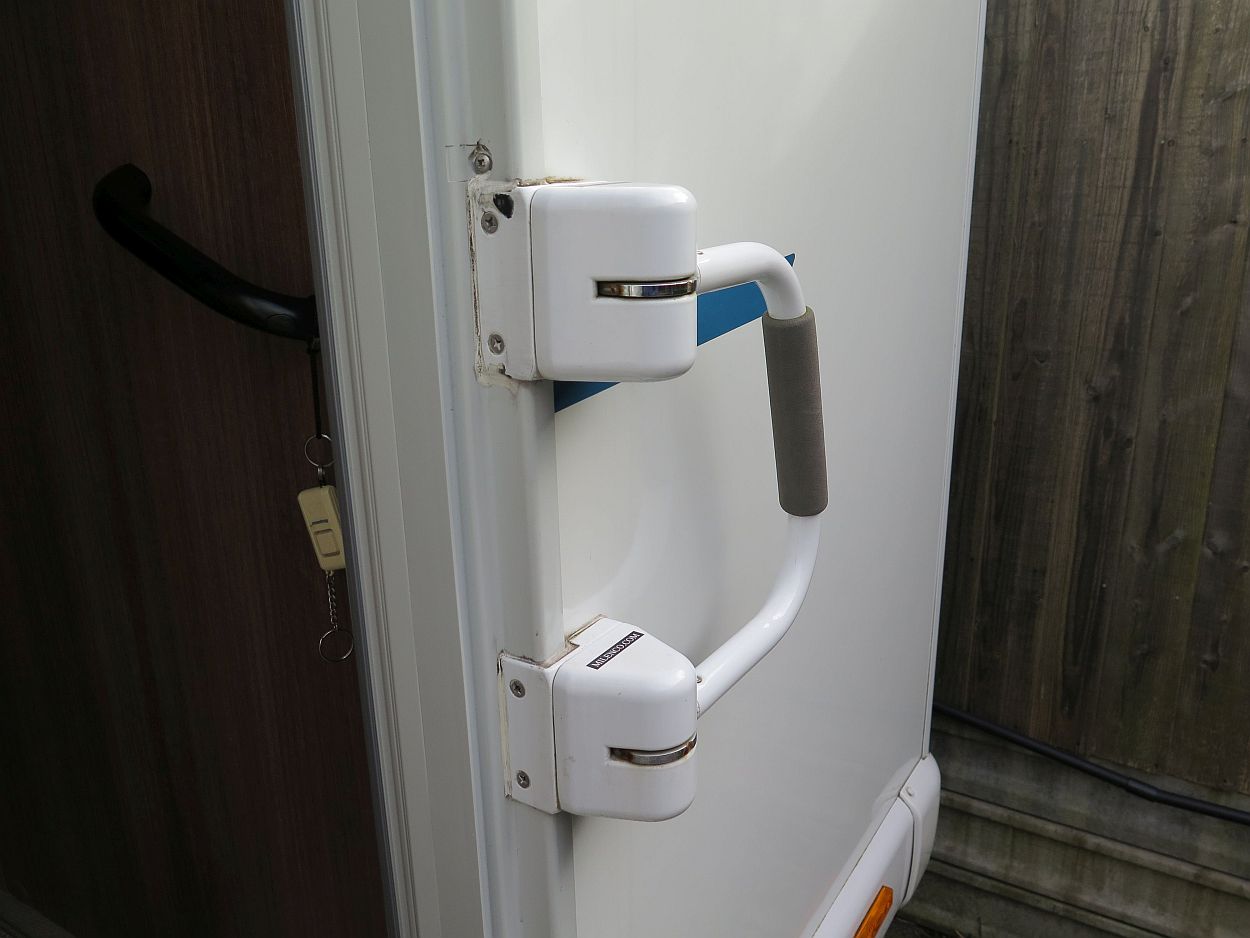
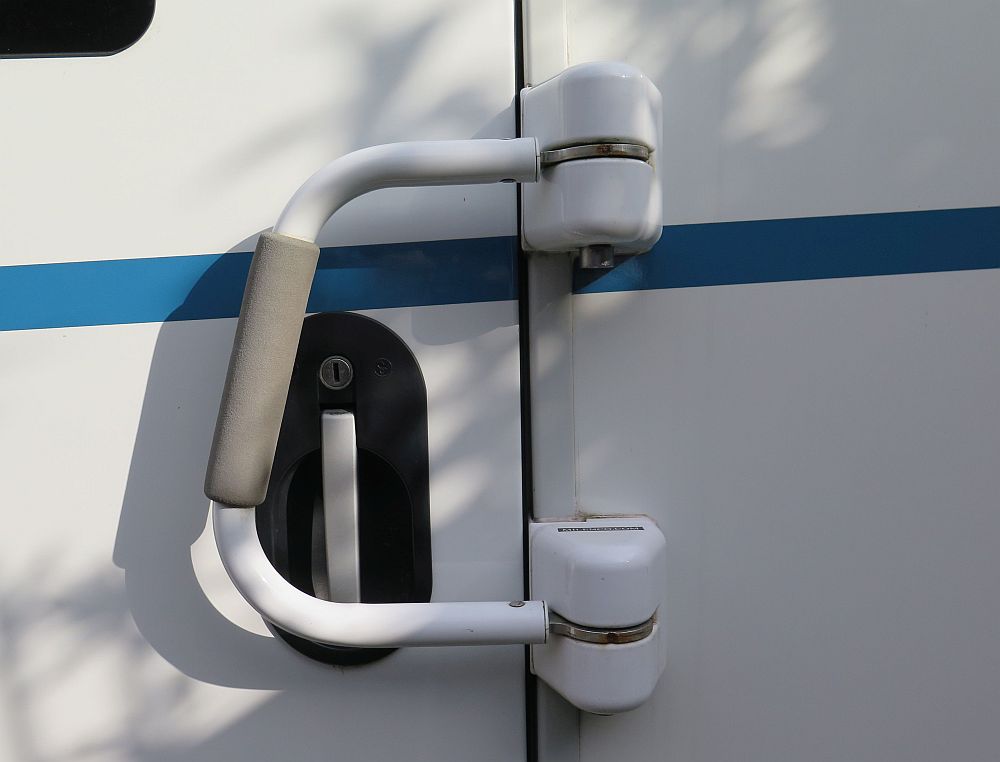
When we purchased the Alliance we specified a D lock for the habitation door which not only acts as another security feature to prevent anyone getting through the door but also as a grab handle, should it be needed. On our previous 740 SE we had a Fiamma D Lock fitted but this couldn't be fitted to our model as it requires bolting through the side of the motorhome which in our case would mean going through into the shower! White arches suggested that we consider a Milenco alternative as that fitted against the door pillar although it would have to be machine down a bit so that the door close without hitting it. This seemed a sensible solution so we went ahead and asked for it to be fitted and it seems a solution that works well.
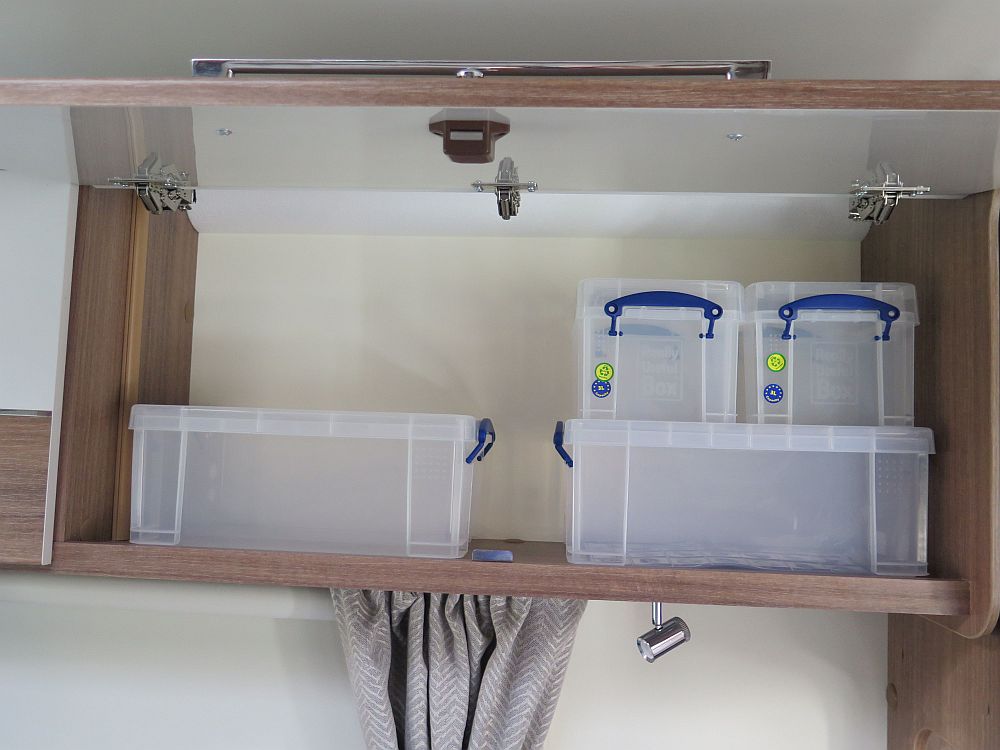
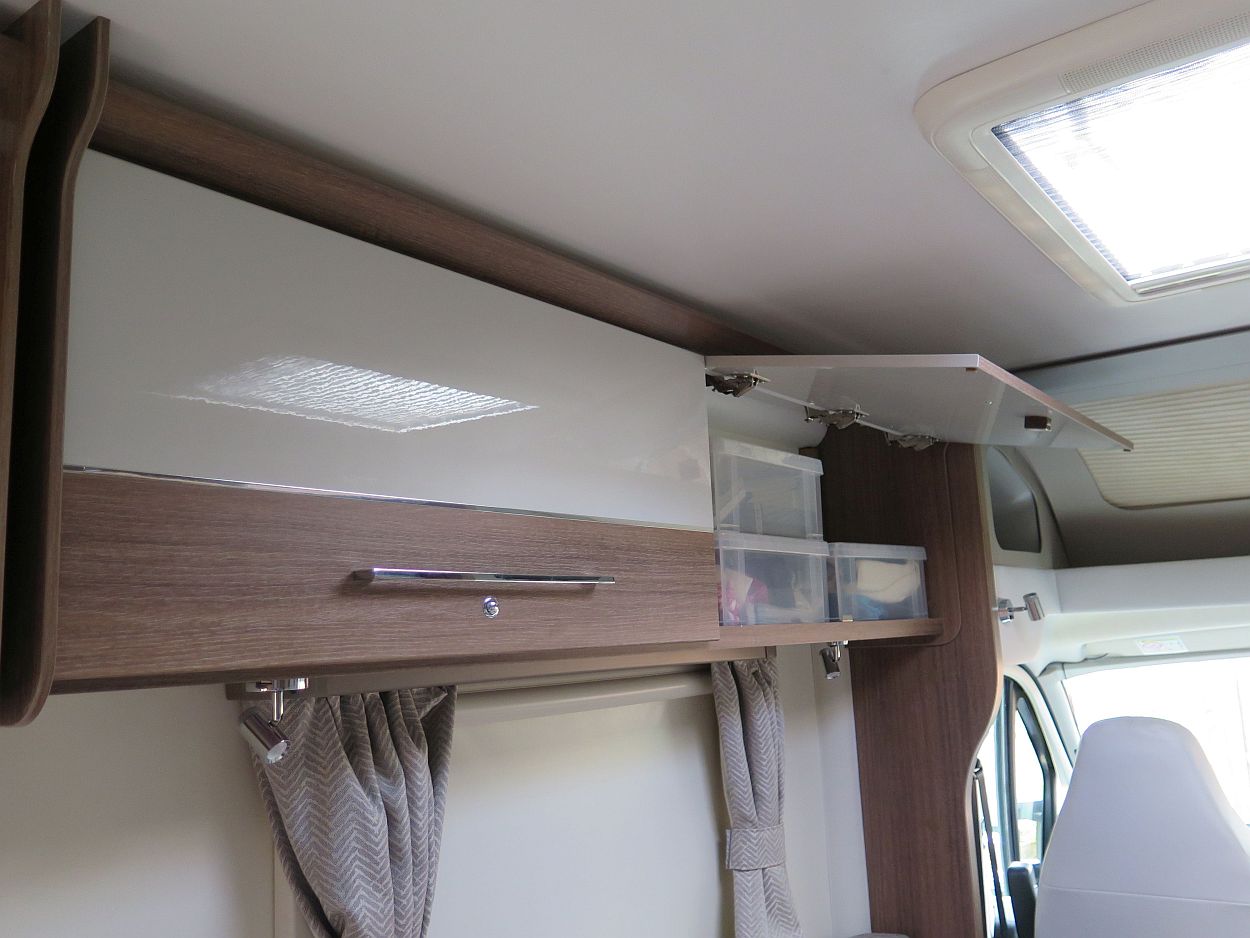
Overhead Locker Storage
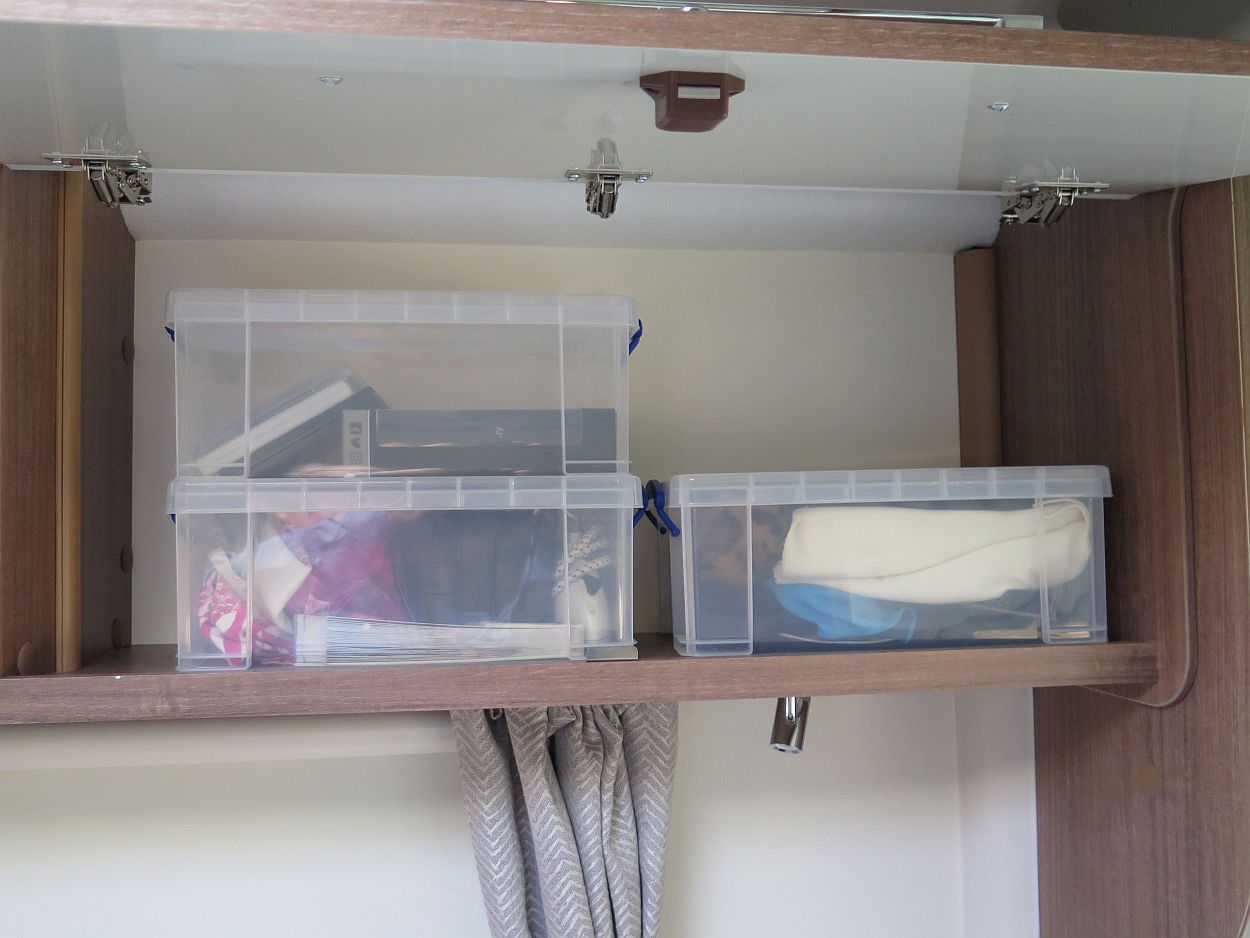
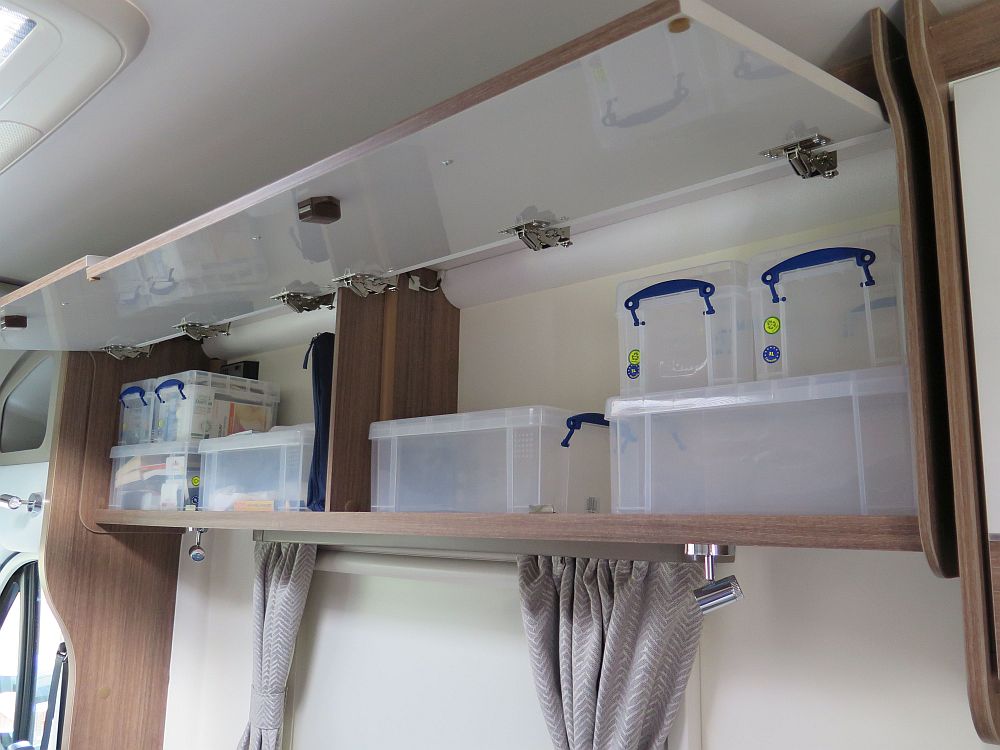
In their wisdom Bailey decided not to fit shelves in the four main over bed main storage lockers. Probably a cost saving exercise but I just wish they were aware how frustrating such short cuts are to the customer! The costs to them would have been minimal. So a solution had to be found. Obviously you have to be careful how much weight is put in the lockers and you also need it to be secure. For some time I have been a fan of the products produced by the Really Useful Box Company they are well made with good locking handles. The 9 litre box is the size we chose for most situations but two of the smaller 3 litre boxes will sit nicely on top of one of the large ones. There is still a bit of room to fit things on top should you need to and also a bit of room between the boxes. It is a neat solution to a problem that shouldn't exist. Another added advantage is that when it comes to emptying the van for servicing the boxes neatly stack somewhere in the house!
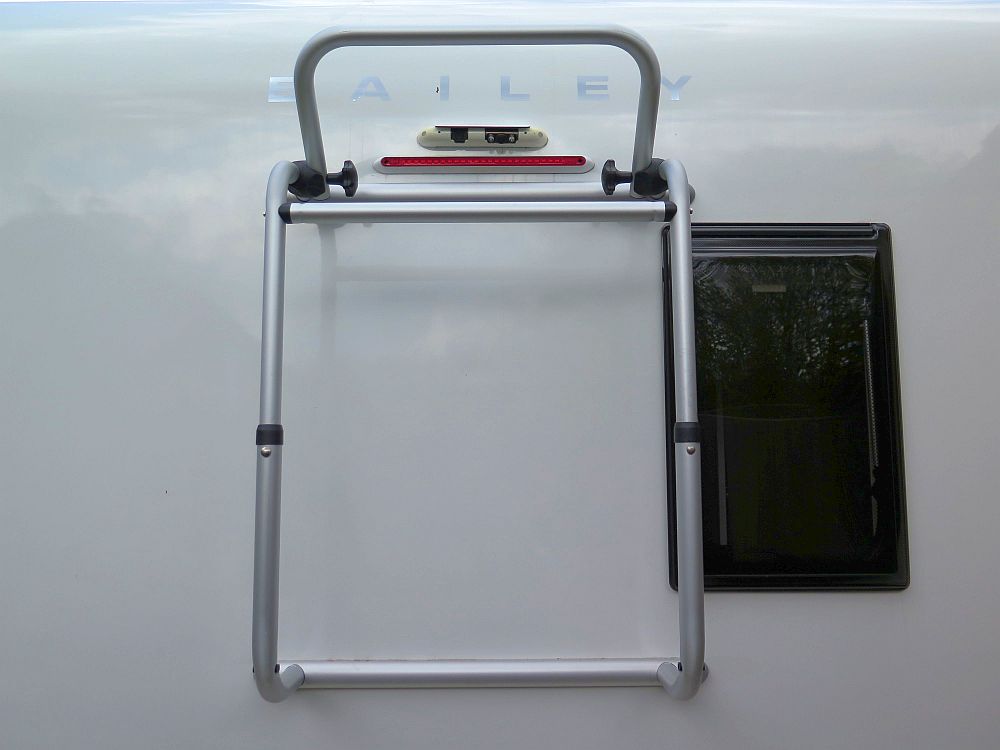
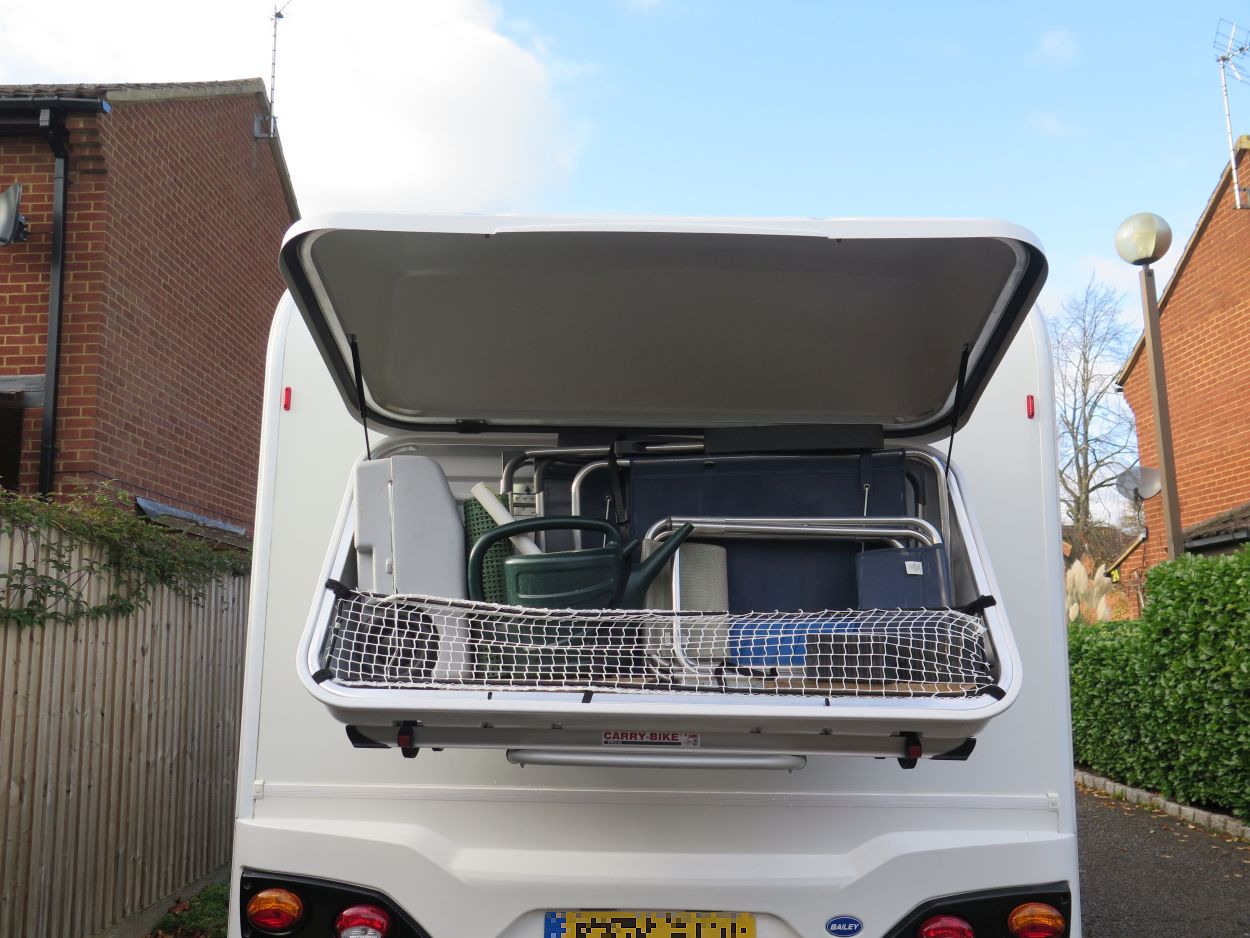
Fiamma Bike Rack
On our last motorhome we had a Fiamma Bike Rack fitted which we used to carry our bikes whilst we owned the van. We are currently in a bit of a dilemma as to whether we will use our electric bikes with this Alliance van as we are not so keen on road cycling but wanted to retain the flexibility should we either change our minds or decide to add a Back Box to provide us with storage room. Initially we thought about a chassis mounted bike rack but were quoted £1600 which we thought was a bit steep given that it might never be used. An alternative, suggested by someone we know, was to consider a towball mounted rack. That would have the advantage that we could also use it to tow a small car, something that Margaret is not keen on! Even so the costs of that sort of set up is similar to the chassis mounted rack. This brings us back to the Fiamma Bike Pro Rack which we finally decided on at a cost of just over £200, so less important if we don't make much use of it. Fiamma now say that if you are carrying electric bikes you need to buy their upgrade package which basically replaces the part which the bikes rest on and beefs it up. The cost is an extra £150 so not likely to break the bank?
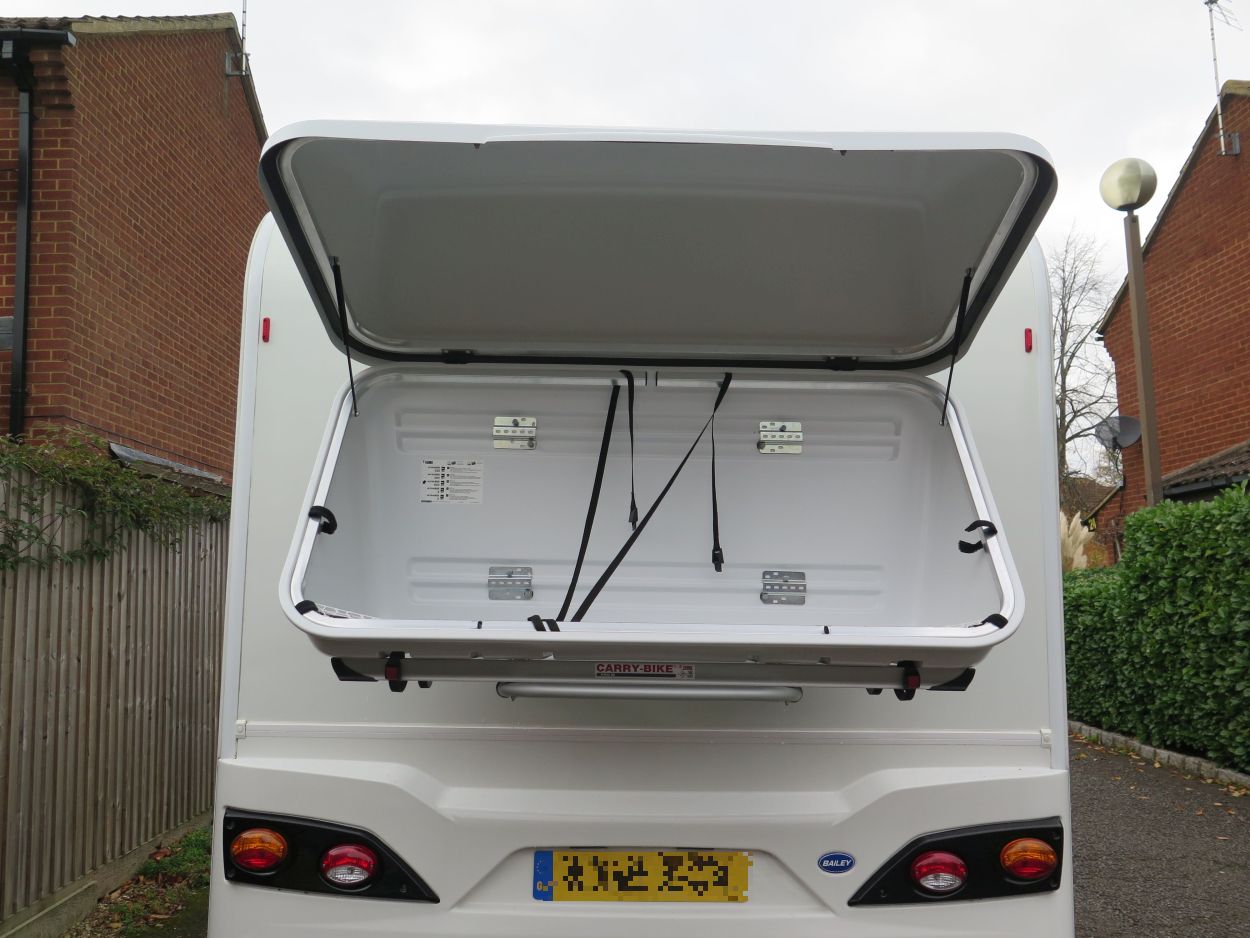
The next decision is whether you fit it yourself or ask your dealer to do it for you. That decision might rest on what is fitted to the motorhome in it's original form. Our Alliance comes with the fixing bars already in place so no need to drill through the motorhome wall to attach the fixing brackets which makes life much easier. Had we not had the ready fitted bars I think I would have got the dealer to fit it.
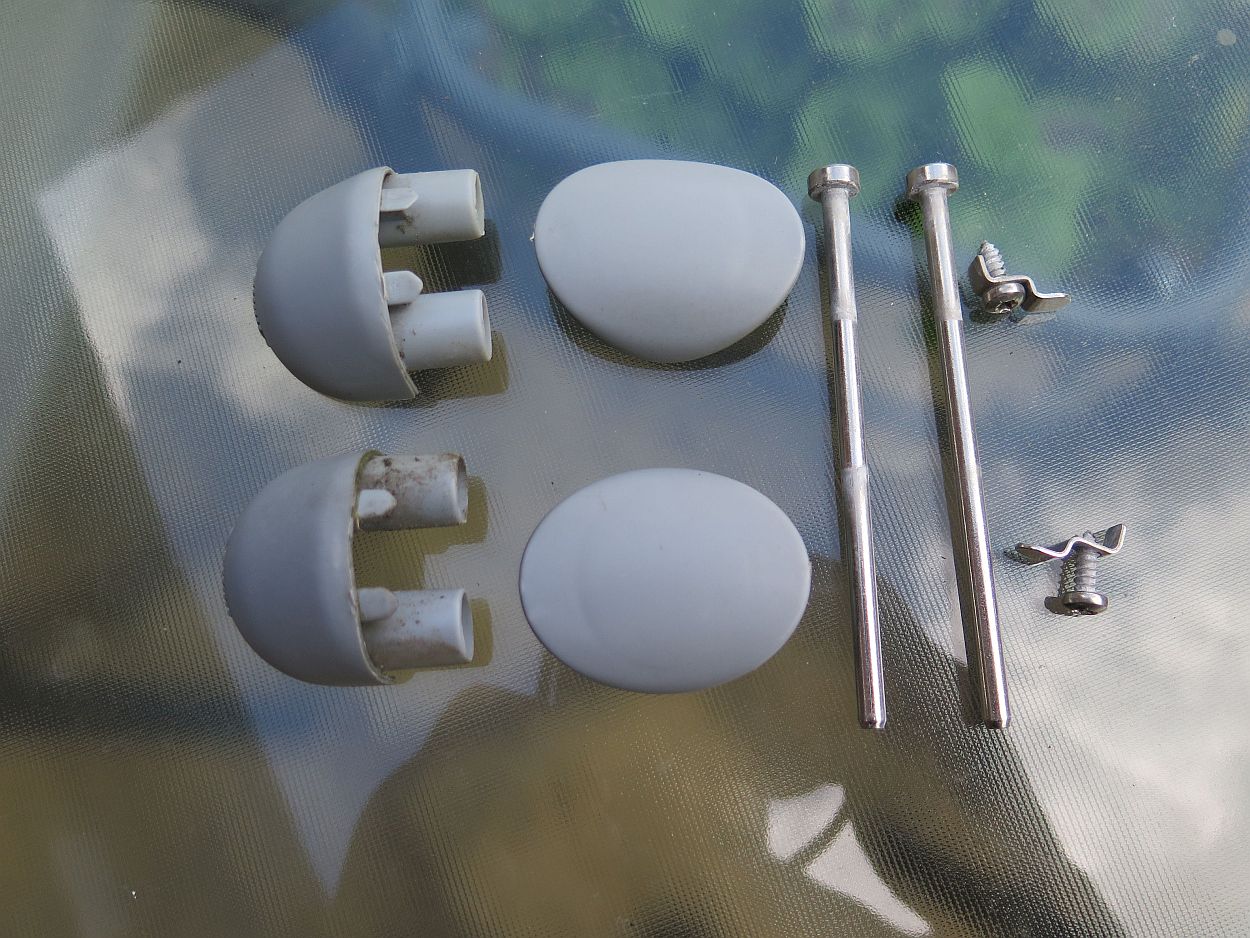
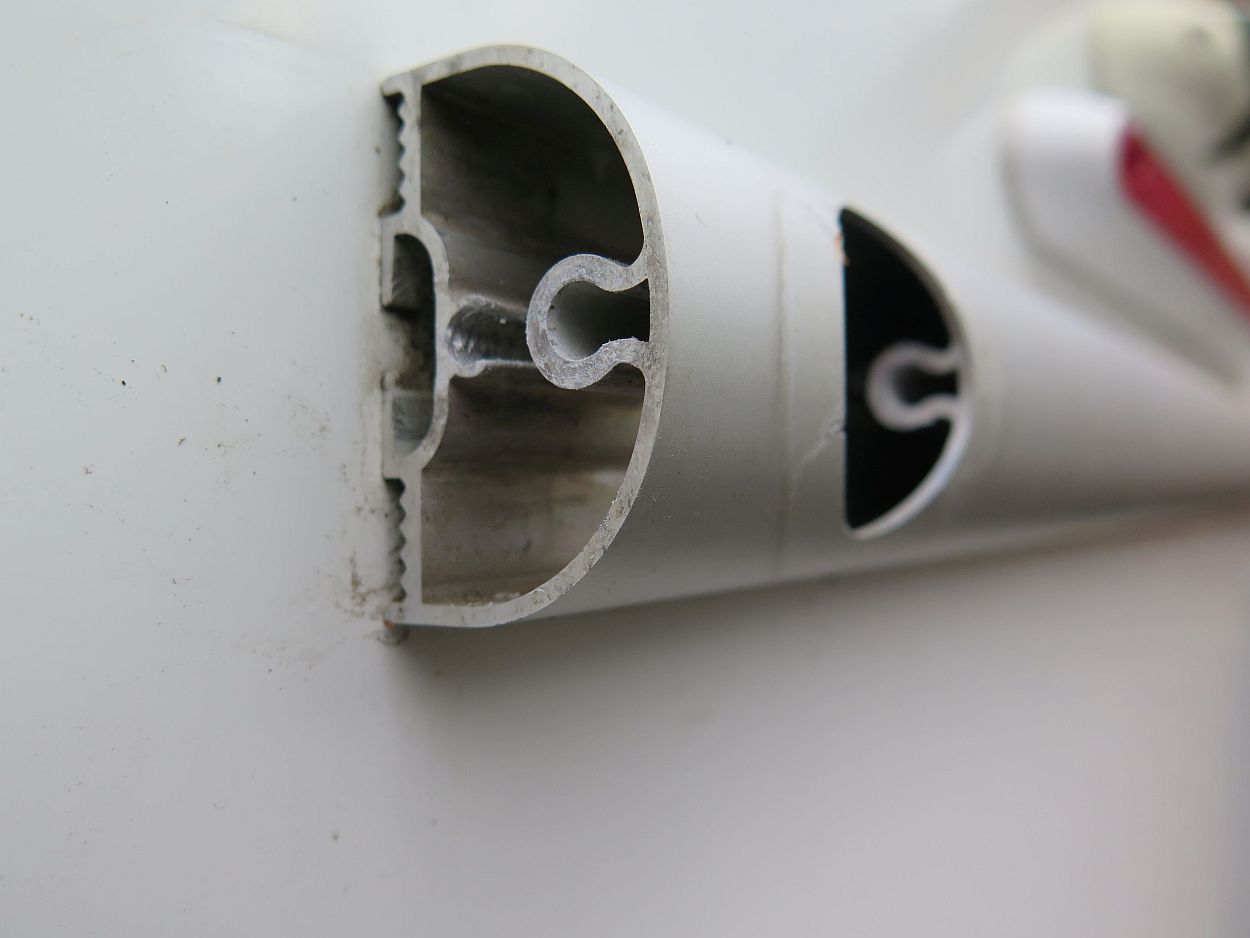
It is also important to establish the size of rack you require. This can be done by measuring the space between the centres of the grey bungs in the fixing bars and the same method can be used to measure the length. On our motorhome the horizontal spacing was 60 cms and the vertical was 80 cms. Having supplied these figures to Agent Fiamma they said that we needed the Cycle Pro M rack as it can deal with the extra vertical distance.
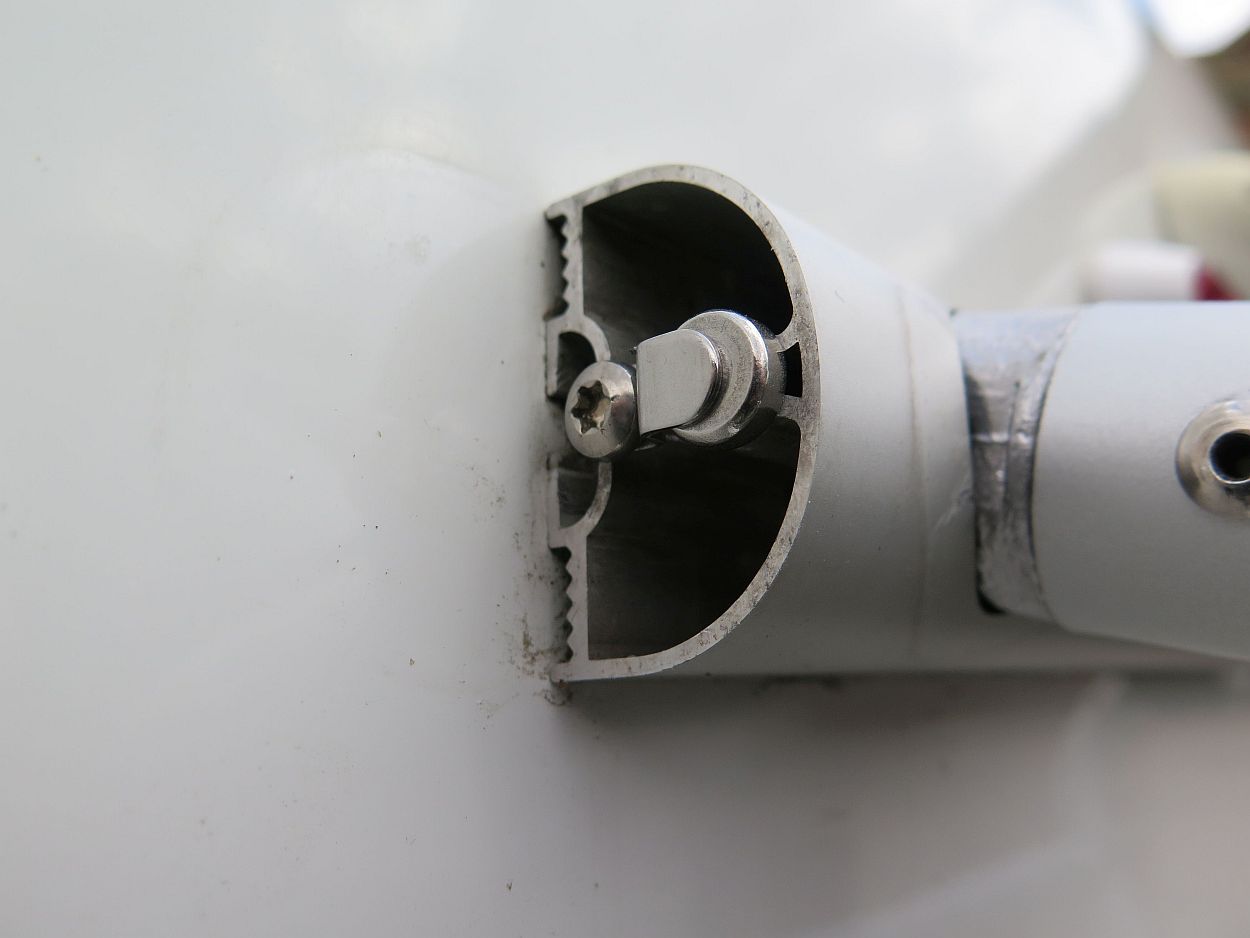
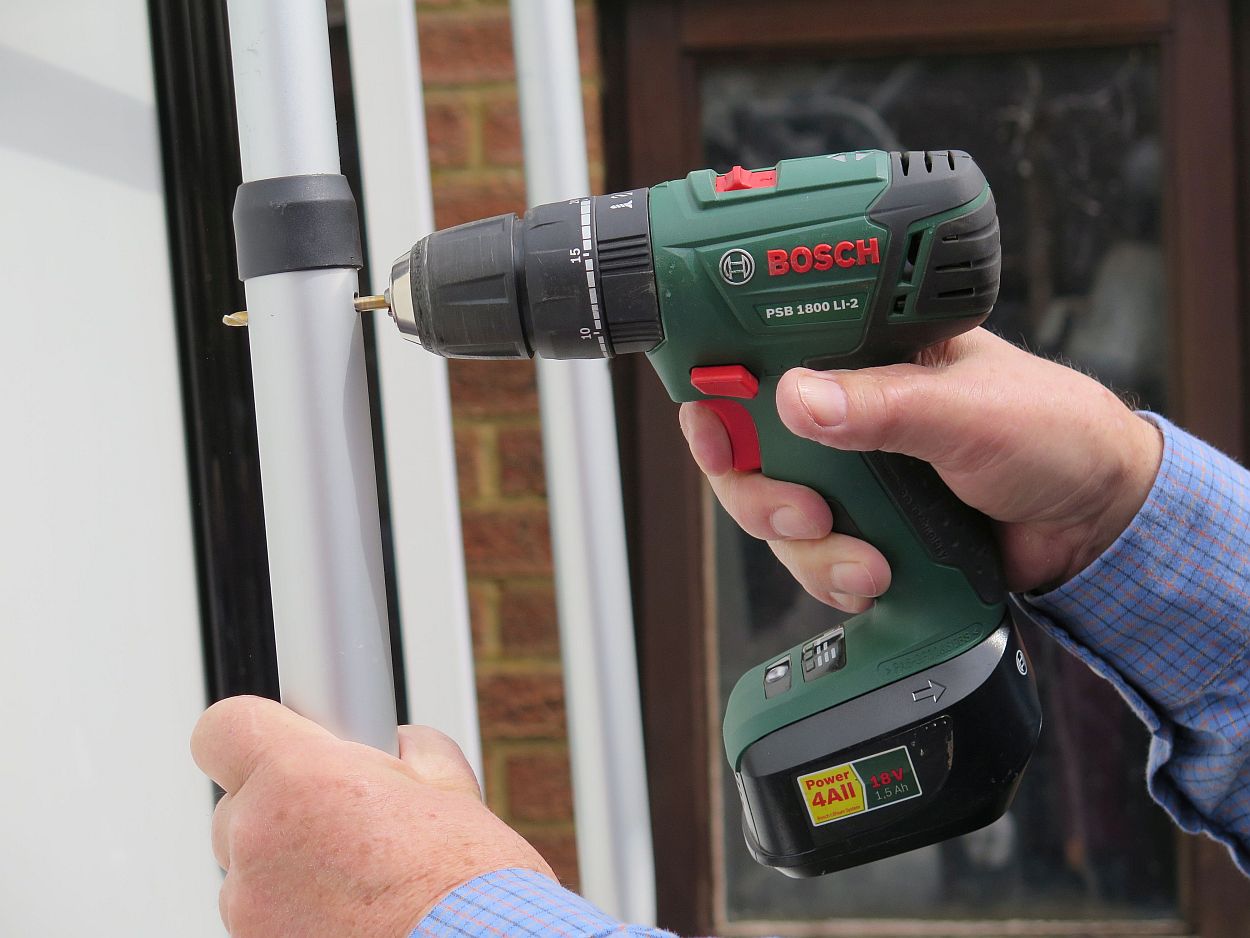
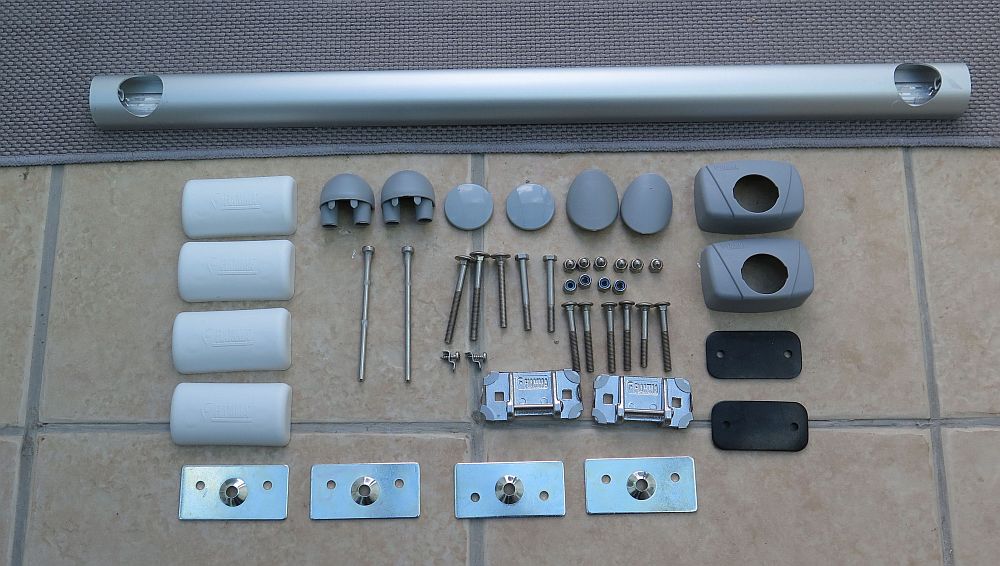
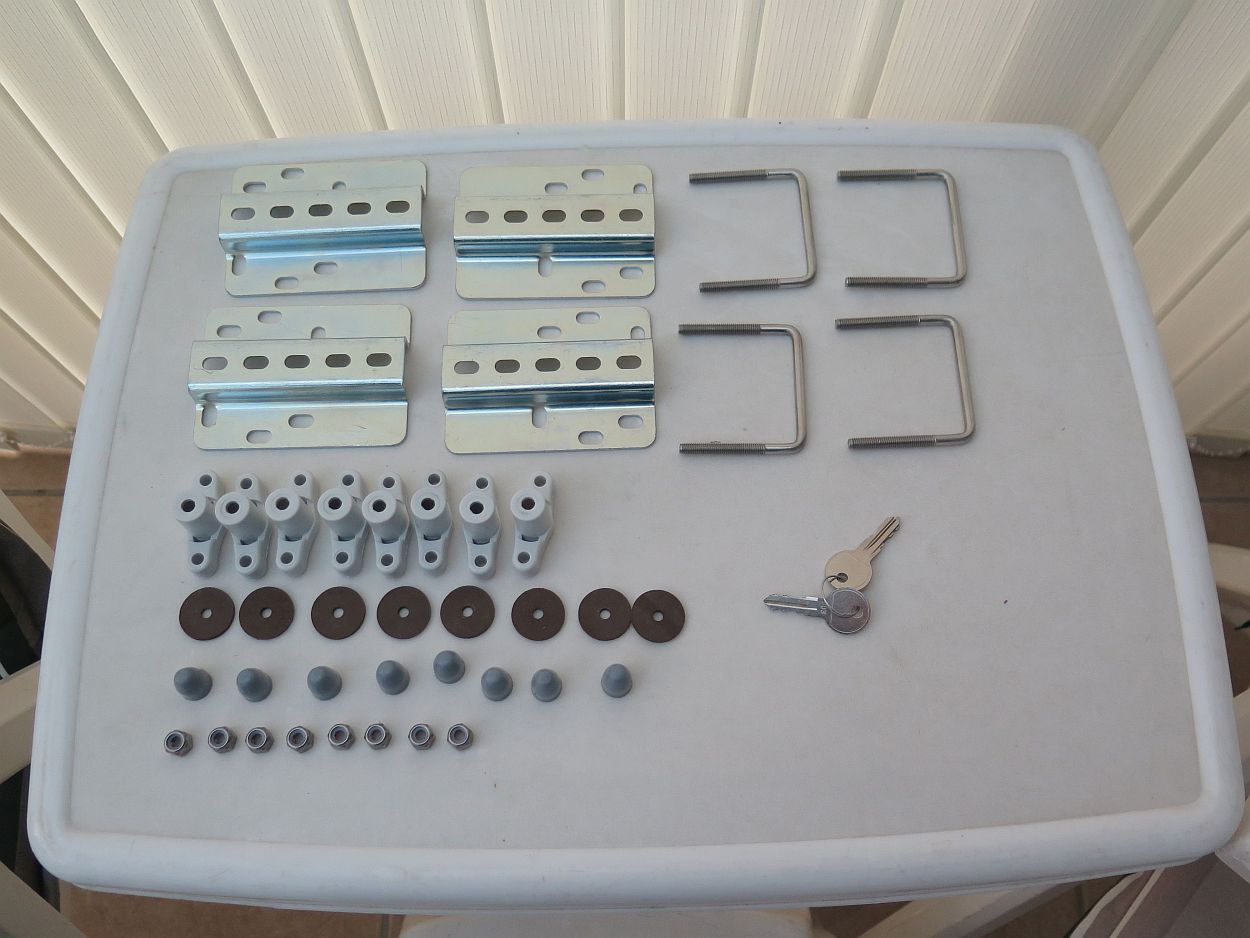
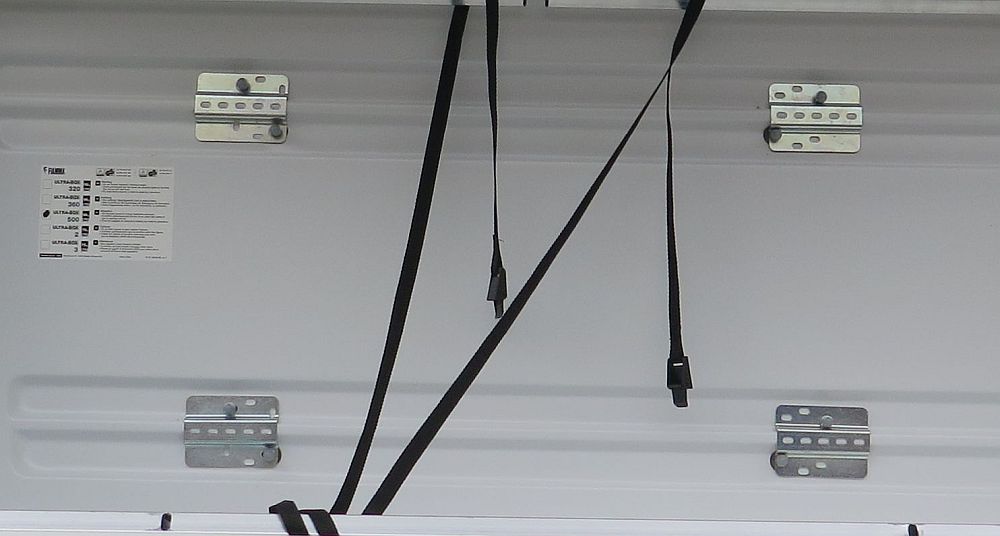
Once you have worked out the process the fitting is fairly straightforward. The four points where the rack attaches to the ready fitted bars are secured by long pins which are kept in place with a clip and a small screw. (see pictures below) To start you remove the end bungs which should just wiggle out. The bungs in the bar are secured in place by the pins that you will later use to secure the rack. You will need a star ended screwdriver to remove the small screws and clip. Depending on how long the pins have been in place they may need some help with a sharp ended tool to gently ease them out. Because the M rack is slightly longer than some it has an additional cross member which I found useful to assemble the top section complete which made it easier to fit into the top bar. The lower sections that fit into the bottom bar slide into the top section which allow adjustment depending on the horizontal distance between the bars. The bottom section is slightly different when it comes to fitting the pins as rather that hooks on the top part the pins go through the actual rack tube. I found I needed to open the holes slightly in order to allow the pins to go through these holes. When all four pins are secured in place you can replace the end bungs. The only other task, and the only one that requires drilling is to drill holes through where the top and bottom tubular sections join together in order to fit a bolt through.
The final construction job is the fit the actual bike holder. This is held in place by two bolts. The instructions state that must maintain a certain distance between the bracket and the supporting bar to allow for the rack to fold. There are two push in plastic clamps that hold the folded rack in place. At the top of the rack fixed to the van is an adjustable cross bar to which you fix the cycle holding blocks. The rack comes with two one short and one long.
In the end it was not so onerous to fit as I first thought and the work can probably be completed in about an hour. The only tools required are aforementioned star/torx screwdriver. an electric drill and a couple small spanners.
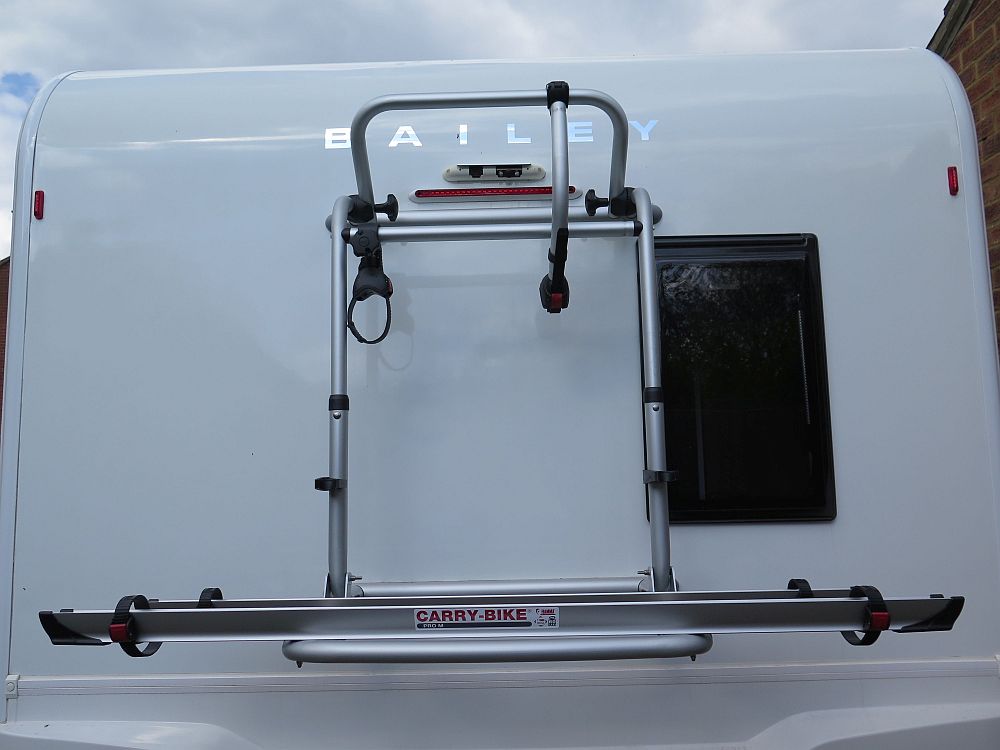
As a post script I should perhaps add that when you buy a Fiamma Bike Rack it comes with everything needed to fit to a bare back of a motorhome so because Bailey, fortunately, pre fit the support bars, you end up with quite a view bits you don't actually need. So no need to panic if at the end of the job you have bits left over!!!! See picture below.
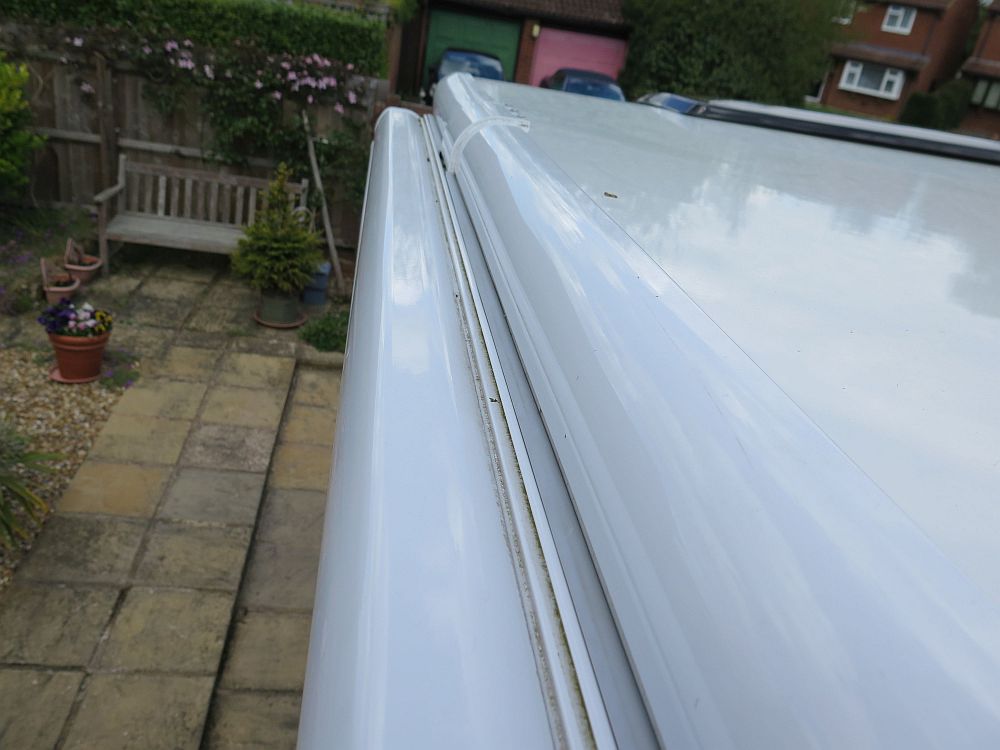
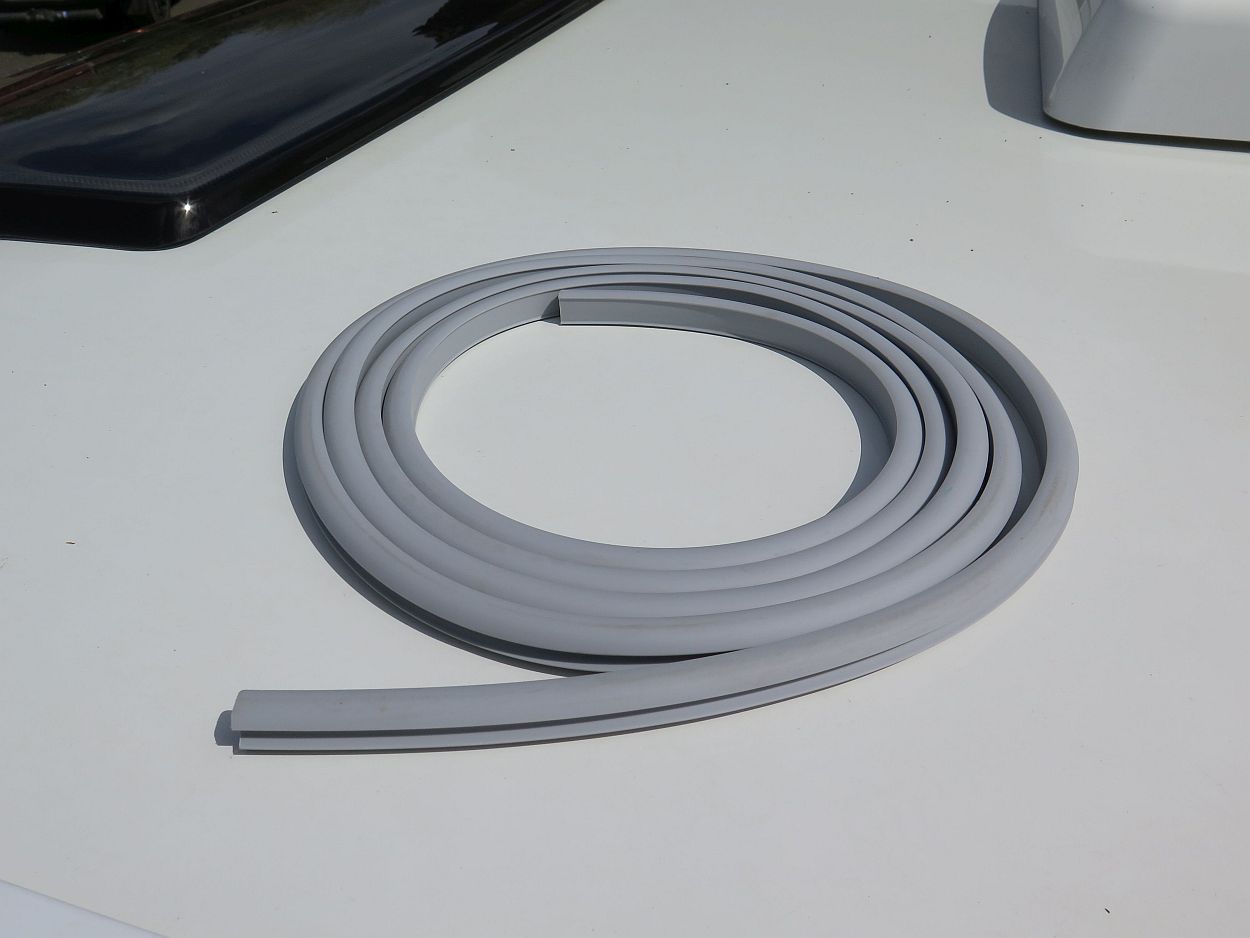
Rain Guard
Fiamma canopies are very useful bits of kit if you don't want the bother of a full awning. We tend to use ours as a sun shade and don't leave it out overnight. Because they don't fit close to the side of the motorhome you do tend to get the rain running down between the sidewall and the canopy housing. This can leave streaks down the side of the van. One solution is to fit a rain guard which is basically a length of rubber which is pressed into the gap. Depending on the original fitting of the canopy there are several version of the rain guard available. For mine I thought I needed the basic narrow rain guard. I had hoped to fit it in one complete length but I discovered that wasn't possible because of the way the canopy brackets were fitted. I therefore had to cut the rain guard into lengths and hop that proves effective. Once you get started it doesn't take long to complete the job. See pictures below.

Alloy Wheels
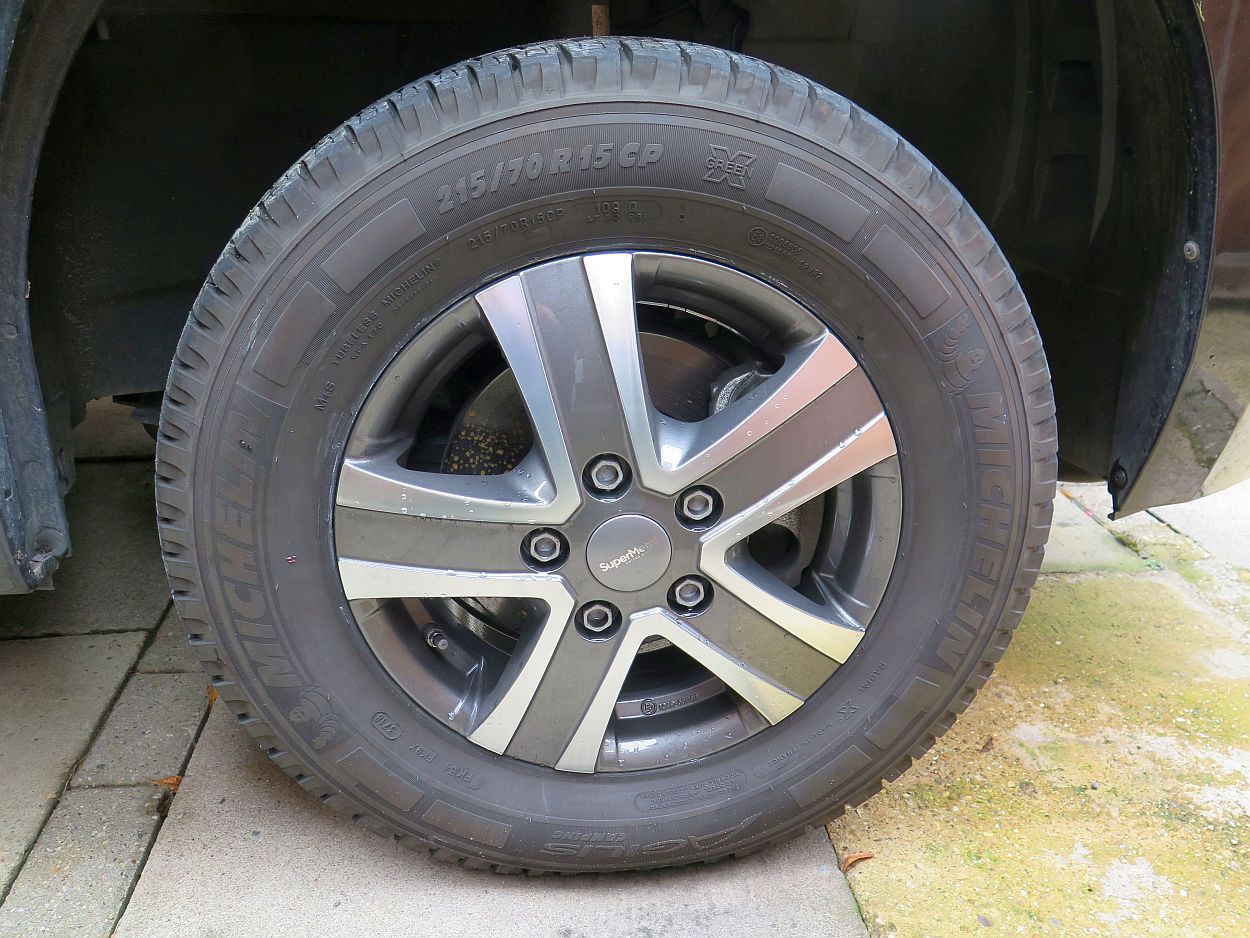
I have been thinking of alloy wheels on the Alliance almost since we purchased it. Just a pity that the model year after ours actually came with alloys as standard. They are not a cheap option so probably why its taken so long! It's not altogether a vanity product, I feel that alloys will make the checking of pressures easier and no need to use wheel covers like on a steel wheel.
Difficult to imagine that I first discussed the idea of ordering alloy wheels with White Arches back at the start of 2021. They ordered them but we had to wait and wait before Bailey Prima Leisure could deliver them. It was around the first or second week of August, that out of the blue, I got a message from White Arches that they had arrived. They had arranged for the Rushden MOT Centre to do the work. On the 21st August we took ourselves off to Rushden. Whilst they did the work we walked down to the White Arches caravan showroom to have a coffee and also spent a bit of money in the Accessory Shop! Because of the TPMS they had to swap the metal valves over to the new wheels. There was a bit of a debate about locking wheel nuts but the ones ordered did not fit and the general opinion of the guys at the MOT Centre was that they rarely fit them to motorhomes. I think it's the same with new motorhomes sold with alloy wheels. The upshot was that we decided not to bother. On our last trip away I had a look around a few motorhomes on site with alloy wheels and more didn't have them than did. BTW, the same bolts that were used for the steel wheels are also used on the alloys. We seem to have settled on a torque setting of 160Nm which is the same as the steel. I am checking regularly but after a trip of 160 miles there was no slackness. The total cost of the wheels and re-fitting was around £650. I didn't think that too bad given I only had to present the van at Rushden for them to do the work without have to find my own fitter. The old rims and trims join a growing number of motorhome bits in my garage which I need to get sold!!!

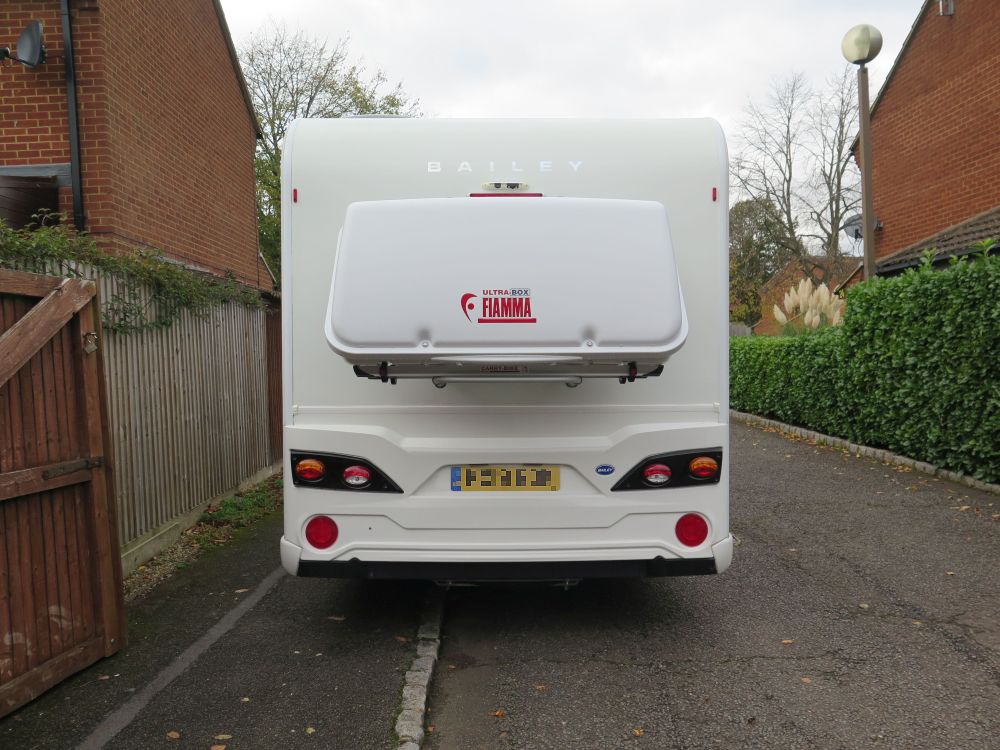
Fiamma Back Box
Because of the size of the van we often find ourselves moving things around in the van as we change from day to night layout. For example we have been carrying the chairs in the shower but when we need to use the shower we have to find a new home for the chairs. They were quite costly so we are not comfortable slinging under the van! Also one of the main under bunk storage areas contains things that are used outside the van and we wanted to be able to free up that space for other things. I think we have come to the conclusion that at our age we won't be using cycles so that freed up the bike rack to accept a Back Box. We decided on the larger 500 version. They are certainly not inexpensive at around £500. We also hit upon a supply problem. I had been in regular contact with Agent Fiamma from whom I buy most of my Fiamma products. As a result of a several month wait we were late in fitting the box as it did not arrive until October 2021.
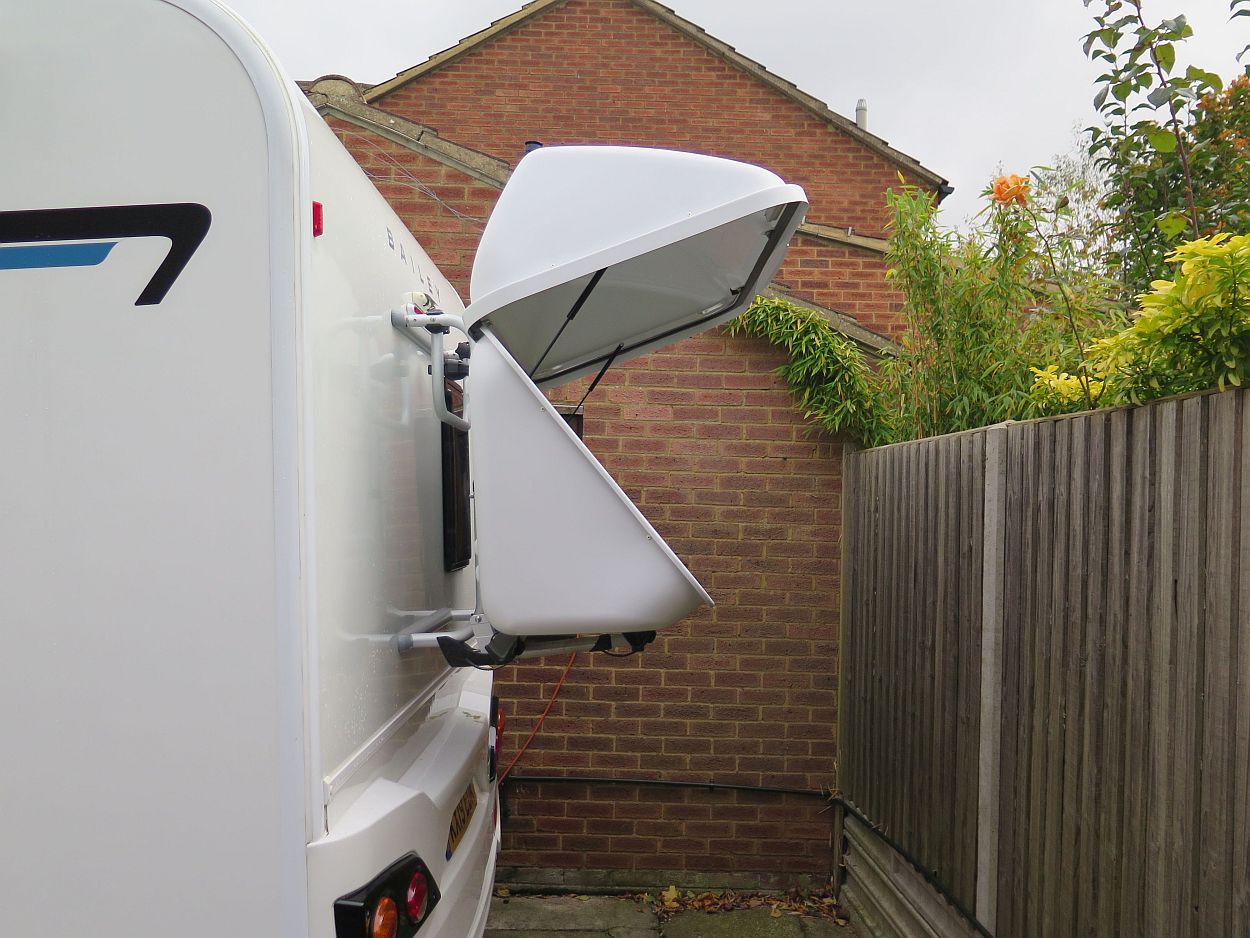
I think Margaret was surprised by the size of the box and immediately christened it "the coffin"!!! It took up residence in our conservatory for quite a while as I felt I needed help to fit it. My youngest son Simon said he would help and in early November had a window of time. When I said I needed help to fit I should more properly say that I assisted Simon rather than the other way round! The odd thing about these boxes is that they don't come pre drilled for the brackets. This is odd because as far as I know all Fiamma bike racks are the same width. In trying to work out were the holes should be drill you are to some degree working blind. Careful measurement is required. On that score Simon did pretty well with only a minor error on one hole. U bolts fit around the uprights of the bike rack but they have to be placed diagonally. Metal support plates are fitted on the inside of the box and the U bolts fastened to these. There are four plates in all. Once the the position of the holes is established it is then quote a straightforward procedure to fasten the box to the rack. The fittings for the bike rack on the Alliance 66-2 are quite high up so I suspect we will always have to use the door step to reach the items in the box. Whilst the box has internal straps to keep things in place they are not very long so it did cross my mind that an external locking strap might be worthwhile?
Once the box was fitted I took it out for a short run just to establish that it was safe! I then loaded it and did the same again. Because the box is so high I was concerned about the rear view camera both in long view and reversing mode. The rear view is not too bad although half the screen is taken up by the box! Reversing is more difficult as the view is not so good. I tend not to manoeuvre in tight spaces without Margaret guiding me anyway so will see how we get on before deciding on alternative cameras.
Water Pump
As mentioned further up the Blog the water pump system installed by Bailey has not been ideal. What we have found, particularly when travelling and stopping for a break, is that the submersible pump stops pumping water and has to be bled to get going again. My theory is that the pipe attached to the pump tends to empty out when on the move causing an air lock which prevents the pump working although you can still hear it going. I did find that travelling with a three quarter full water tank did help the situation, but that was only possible because the van has a good user payload of 750kgs. Whilst on site it worked without problems but I do tend to keep the water tank topped up. Another consequence of having such a puny pump is that the pressure, especially in the shower, is not great. The solution was to have a proper, external to tank, pump fitted which we had done at our February 2022 habitation service. It wasn't cheap (what is!) at £300 but I am hoping it saves a lot of frustration and a better delivery of water to the shower in particular. Have tested it but not really used it in anger yet but will add a note when we have.
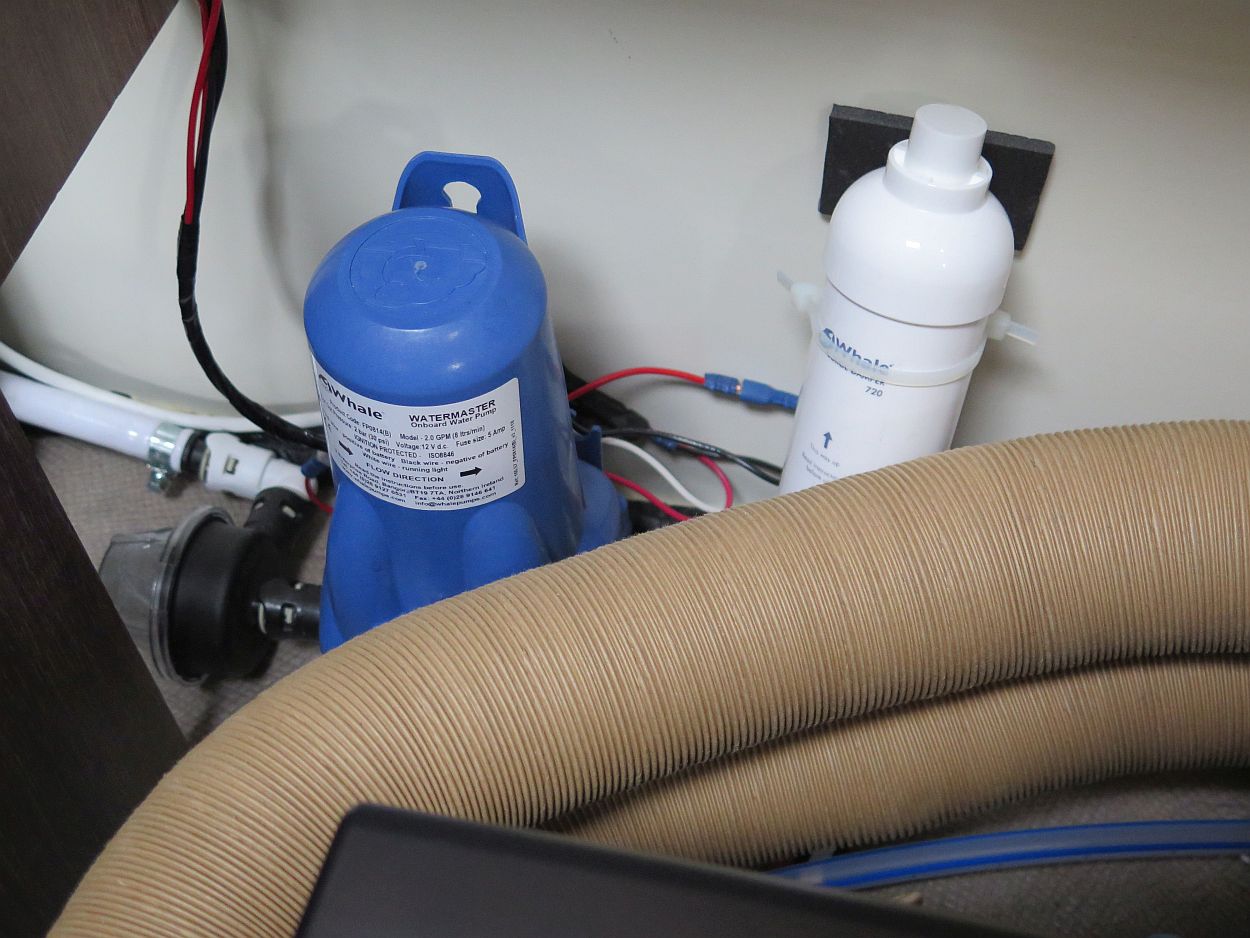
I thought I would report back on the new water pump as we have had the opportunity to use it whilst camping for the first time. (early April 2022). I think it is a little noisier than the submersible pump but perhaps that should be expected as its not shielded by the water and the tank? Performance wise such a difference. Far greater pressure at the taps and particularly in the shower. However the main advantage is that it doesn't lose pressure whilst travelling. Something which I also noticed was that it doesn't repressurise the system very often. With the old pump it happened quite frequently.
Peugeot Boxer Cab Recall
In late March 2022, I had a letter from Peugeot saying there was a recall on their Boxer range (the base vehicle for my motorhome) to check that brake pipes were installed correctly. Normally everything to do with the motorhome is done via our dealer White Arches but in the case of recalls which don't coincide with a service, they refer customers to a local Peugeot dealer. You can understand this as its just double handling! The problem is finding a suitable dealer. Perrys in Milton is a Peugeot dealer but they decided that our motorhome was too large for them to handle so they refused, despite Peugeot listing them as being able to handle motorhomes! White Arches suggested York, Ward and Rowlatt Ltd, at Wellingborough which is about 20 miles from where we live. They were happy to oblige and we arranged to take the van in on Wednesday 20th April at 2.00pm.
On the 20th April we set off for Wellingborough, deciding to approach the dealer from the north to avoid the town centre. We arrived with a bit of trepidation as there were vehicles everywhere but a member of staff directed us to a different part of the yard. We booked in at reception who said that in addition to the brakes they needed to install a software update, so depending on what was done it might take longer than the scheduled hour. Rather than hang around at the dealers we walked into the town for a well earned coffee! When we got back we could see our van parked on the road, wish I had thought of that!!! Apparently the brakes were OK and didn't need any remedial work and in addition to the software update they carried out a complementary 30 point vehicle check which was also fine. They seem a very efficient organisation so anyone in the area and needing a Peugeot agent they are well worth considering. The most painful part of the experience was filling up with diesel at the local Tesco, .30p a litre more that the last time I filled up in December!!!
January 2025. I appreciate, somewhat on the late side, but I thought I should complete the blog for anyone who has seen the news on the front page of this website that we have given up motorhoming. Had we both been fit I think we would still be motorhoming. Unfortunately during 2023 and into 2024 Margaret developed a hip problem which made it difficult to pursue the sort of trips that we had in the past. In 2023 we only managed 33 nights away and in 2024 only 3 very early in the year. It became obvious that the motorhome was likely to be sitting in the back garden with little use. Not helped that prior to its annual service in 2024 we experienced the dreaded Air Bag warning light problem days before the service. This limited our options on how we proceed, to actually leaving it to White Arches to resolve at not an inconsiderable cost of about £700! We did have a few days away in March but things did not look good for the prospect of getting away much that year. Having spent a long time thinking about it we reluctantly decided that we should sell the motorhome. I was also aware that the market for second hand motorhomes was softening after the "Covid" bubble so thought that rather than having a depreciating asset we should sell it sooner than later. We did consider several options but in the end we approached White Arches, the dealer we purchased it from, and they made us an offer which in the end turned out to be more than reasonable. This was at the end of May 2024. The process was very easy and the money was in our bank account within hours of the handover. I suppose not being able to let go I kept checking their website to see if it had sold and by Christmas of that year it still not sold and already had one reduction in price, hence me thinking the deal I got was not that that bad! Interestingly in mid January I received an email from someone who had clearly read this blog who happened to be interested in buying the motorhome and just wanted to ask a few question which I was happy to help with. It seems it has now sold and probably to the person who contacted me.
We first started caravanning in 1982 and changed to a motorhome in 2013. So I suppose 42 years of touring is not bad? As yet we have not explored alternative holidays but hopefully after Margaret's operation we can start thinking and planning although I suspect that it won't be as easy as just going away in the motorhome!
Links to individual tasks
http://www.davidklyne.co.uk/new_table_for_lounge.html
http://www.davidklyne.co.uk/fiamma_bike_rack.html
Previous Blog about our Bailey Approach 740 SE